Latest Posts

Mediterranean Chicken


IMG_5383

I had to put this recipe on my blog. It’s a family favourite and has been one of the most popular recipes from a book I wrote over twenty years ago but has still stood the test of time. It’s definitely a crowd pleaser for a casual supper and the quantities can easily be increased to serve more. I’ve served this for 12 people with plenty of green salad and crusty bread to mop up the delicious juices. Obviously you can serve gluten free bread here instead.

The real key to this dish is the delicious garlic and herb cheese which is cooked underneath the chicken skin. It keeps the chicken beautifully moist and adds amazing flavour. Loosen the skin with your fingers or try using the back of a metal spoon. A lot of chicken breasts are now sold boneless but I prefer using chicken breasts on the bone here as it adds extra flavour and prevents the chicken over cooking. Its harder to find but defintiely worth it.

4 chicken breast portions, about 675g (11/2lb) total weight

115g (4oz) soft cheese with garlic and herbs

450g (1lb) courgettes

2 red peppers

450g (1lb) plum tomatoes

4 celery sticks

about 2tbs olive oil

8 sun-dried tomatoes, roughly chopped

1tsp dried oregano

2tbsp balsamic vinegar

1tsp paprika

salt and pepper

Preheat the oven to 190ºC. Loosen the skin of each chicken portion, without removing it, to make a pocket. Divide the cheese into four and push one quarter underneath the skin of each chicken portion and spread out into a even layer.

IMG_5367Cut the courgettes and peppers into similar sized chunky pieces. Quarter the tomatoes and slice the celery sticks.

Heat 2tbsp oil in a large shallow flameproof casserole. Cook the onions and garlic for 4 minutes until they begin to soften and turn golden brown, stirring frequently.

Add the courgettes, peppers and celery and cook for a further 5 minutes, stirring occasionally. The vegetables should begin to soften slightly.
IMG_5373
Stir in the tomatoes, the roughly chopped sun-dried tomatoes, oregano and balsamic vinegar. Season well with plenty of salt and black pepper.

Place the prepared chicken on top, drizzle over a little more olive oil and season with salt and the paprika.
Bake in the oven for 35-40 minutes or until the chicken is golden brown and cooked through. The colours of this dish are so amazing that I like to take this straight to the table and let everyone help themselves.

IMG_5388

Serve with a green salad and plenty of olive ciabatta or crusty bread. I also like to serve a jug of all the extra juices, as the flavour is so amazing.

Serves 4

IMG_5398This recipe was first published in 50 One Pot Meals. Written by Sarah Edmonds and published by Lorenz Books

Feel Good Smoothie

IMG_5616

I’ve been really enjoying this delicious smoothie on holiday, especially after a quick yoga session and a dip in the pool! The colour is amazing, thanks to the spinach. It not only looks good but also packs in an early dose of vegetable into your day! Actually you can’t taste the spinach but its great for all the nutrients its supplies! Use the ripest melon you can find for a really full summer flavour. The seeds add good fats and the cashew nut butter increases the protein level further, keeping you fuller longer and also help to make a deliciously creamy smoothie. You could also try coconut water instead of water for extra great flavour.

I’m going to make this whenever I feel like a pick me up or quick breakfast. It would also be great to take out on the move or as a post workout snack! I bought my Nutribullet away with me which whizzes everything up so smooth. If you don’t have once you could use a blender but maybe try the milled flax (hemp) seeds instead of whole hemp seeds.

You only need a few ingredients which you can blend to your own taste. I used;

1 large ripe banana

a large wedge of ripe Cantaloup melon

a generous handful of baby spinach

2tsp hemp seeds

2tsp chia seeds

1tbsp cashew nut butter

IMG_5619

Peel the banana and skin the melon, roughly chop and place in the blender with the remaining ingredients, 3 or 4 ice cubes and about half a pint of chilled water. Blend until smooth.

I made this as a generous serving for one person but it could happily be shared too!

Broad Bean & Radish Salad

IMG_5329

This summery salad is so deliciously fresh, using broad beans and radishes which are in plentiful supply at this time of year. I love broad beans, although I do remember a time when the little shrivelled grey offerings on my school dinner plate quickly got pushed to the side!  When I discovered the transformation a broad bean takes on when popped out of its outer rubbery shell, it took on a whole new life. Firstly the colour is so amazing, a vibrant lime green, the texture, smooth and tender, and the taste is so good. I generally use them in salads rather than as a vegetable accompaniment. I love the process of popping them out of the pods, opening each one to discover the beans nestled inside the fur linings, but then I am a bit of a softy! Removing the outer skin once cooked is also a great family job, especially when they ping across the work surface!

IMG_5274
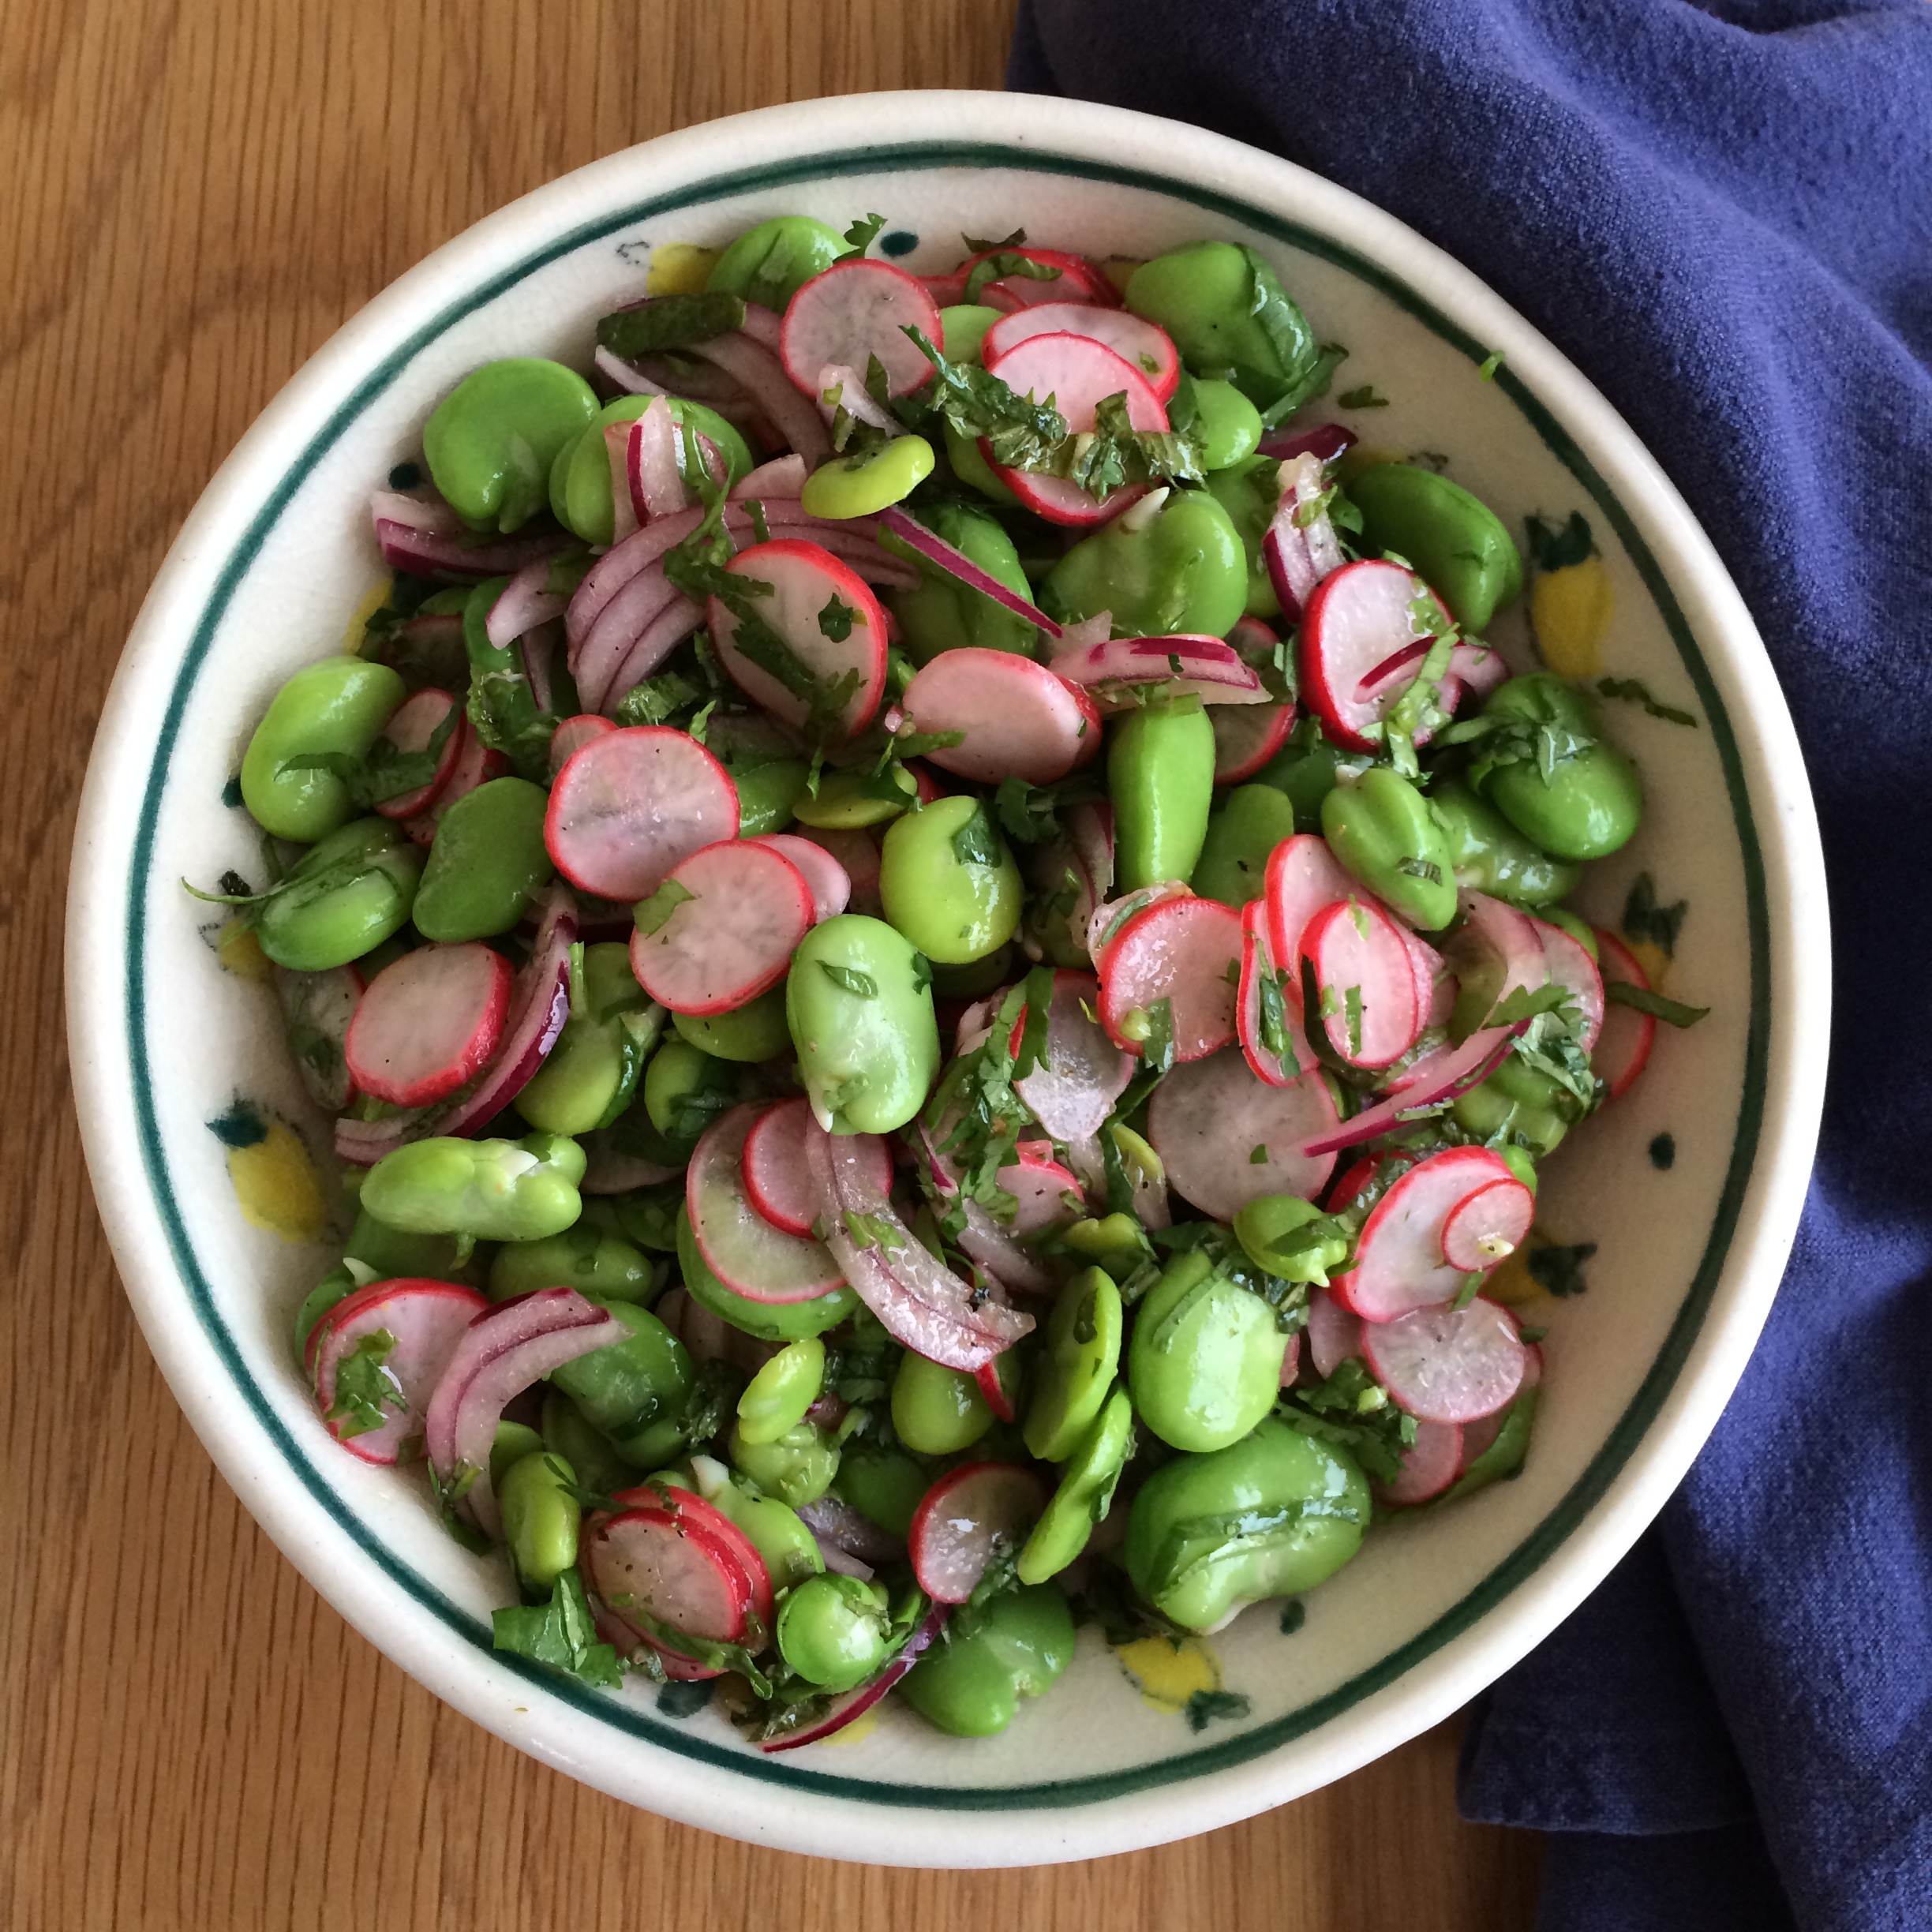
The only disappointment with broad beans is the yield. A 500g bag full of broad bean pods only produces about 125g of broad beans. The young ones are delicious eaten raw out of the pod, but if cooking them, they really only need and 1-2 minutes depending on size. If broad beans aren’t in season then frozen are a good substitute, especially if you can buy the small ones. Simply blanch in boiling water and pop them out of their skins or as they’ve already been blanched as part of the freezing process you could just defrost them, pop them out of their skins and throw into a salad!

I think radishes are one of those love/hateFullSizeRender vegetables or perhaps one that we think we don’t like but actually enjoy it if its in a recipe! Personally, I wouldn’t crunch on a whole radish but they are so good finely sliced into salads or used as a garnish, adding a fresh splash of colour. In this recipe I tried soaking the radish and onion in white wine vinegar before adding to the salad. This succeeded in removing the harsh biting flavour of raw onion and gave the radish a very gently pickled flavour.  Don’t be tempted to leave them soaking for too long though as the colour starts to run out of them and they begin to taste far too vinegary! 10-15 minutes should be enough.

1kg fresh broad beans in pods (about 250g yield)

10 radishes

40g red onion

2tbsp white wine vinegar

salt and freshly ground black pepper

1tbsp olive oil

1tbsp lemon juice

1tbsp chopped fresh mint

2tbsp chopped fresh coriander

Remove the broad beans from their pods and blanch in boiling salted water for 1-2 minutes depending on size. Drain and plunge into cold water.

IMG_5326Meanwhile wash and thinly slice the radishes. Peel and thinly slice the onion. Place in a small bowl with the vinegar and a good pinch of salt. Leave to stand for about 15 minutes stirring occasionally.

Drain the beans and remove the skins by gently pinching a hole in the outer shell and then squeezing the bean out. Don’t press too hard or you’ll end up with a bowl of crushed broad beans!

Drain the onions and radishes, discarding the vinegar. Combine all the remaining ingredients together with plenty of seasoning and gently stir until combined. Serve immediately or cover and stand for up to an hour before serving. This is best served on the day its made.

Serves 4 as an accompaniment.IMG_5342

The fresh tangy flavour of the salad is so perfect with fish. I’ve served this with roasted salmon or barbecued tuna. It also makes a great accompaniment to grilled vegetables and halloumi. You could also add crumbled feta cheese for a really great salad and serve with herby quinoa, mixed salad leaves and delicious tiny tomatoes fresh of the vin. You could also add a little Parma ham on the side.

The Soulful Food Co

IMG_5209

This week I’m sharing one of my foodie finds with you! Eating out, gluten free, can be a real challenge, especially at festivals and outdoor events. There’s always an abundance of burger vans, pizza ovens and Burrito stands so it often means taking your own food with you. It’s quite exciting to see the gradual increase in healthier options available such as falafel salad bars and smoothie & juice bars at the these events. You may still have to look a little harder but the options are there! So as you can imagine, I was really excited on my first day wandering around the Glastonbury Festival to discover The Soulful Food Co where there!

IMG_5210I first sampled The Soulful Food Co last summer at CarFest and worked my way through all their gluten free options. (Take care when choosing as not everything is gluten free but all their dishes are clearly labeled as free from.) The good sign was that I kept going back for more and soon family and friends were also really enjoying their Hotpots, Curries & Stews.  My absolute favourites are the Butternut, Lentil & Spinach Hotpot and the Thai Green Curry with Kelp Noodles. Packed full of great flavours, with tender meat and vegetables that haven’t become soft and mushy! Its really a home cooked experience, probably because everything is cooked with well sourced fresh ingredients and prepared and cooked slowly, by hand, in their kitchens in small batches.

If you aren’t lucky enough to be able to visit their really cool airstream van at an outdoor event then you can now buy their Hot Pots from Ocado. Visit The Soulful Food Co website for more details about them, where they’re planning to be and how to get hold of their delicious hotpots!

If you see them be sure to give it a go, I don’t think you’ll be disappointed!

IMG_5218I really enjoyed this Squash, Lentil & Spinach Hot Pot with a delicious grain salad of red rice, quinoa and buckwheat with a shredded slaw salad. The finishing touch was a spoonful of sour cream and a good handful of fresh coriander on top. Not bad food to find in the middle of a field!!

Chargrilled Vegetables with Tahini Dressing, Pomegranate & Coriander

IMG_5068This has been one of my favourite things to cook on the barbecue so far this year. I love simple chargrilled vegetables, the flavours are amazing. The smokiness of the vegetables with the fresh tahini dressing and pomegranate seeds are a great combination. You can enjoy this as a salad on its own or as part of a bigger feast! I’ve served it with chunks of seared beef or lamb accompanied by a green leafy salad and a big bowl of herby quinoa.

I seem to be really drawn to pomegranate at the moment, I’m loving the little bursts of colour and flavour they give a meal, as well as the health benefits of being a good source of fibre, vitamins, iron and rich in antioxidants.

This recipe is so easy , if you prepare a large bowl of quinoa, roast plenty of vegetables and make the dressing you can store all these in the fridge and assemble an easy lunch or supper in minutes…perfect!

Don’t worry if you’re not into barbecuing or want to eat this when the weather is not so good. You can cook the vegetables in a hot oven, about 220ºC for about 45minutes, turning occasionally until softened and browned.

For the vegetables;

about 250g butternut squash

2 courgette

2 aubergine

2 red pepper

4tbsp olive oil

1tsp chilli flakes

salt and freshly ground black pepper

For the dressing;

150g natural Greek yogurt

30g light tahini paste

1 large garlic clove, crushed

1 lemon

To serve;

1 pomegranate

small bunch fresh coriander

Wash the butternut squash, but there’s no need to peel it. Cut into very thin slices. (I tend to use the thinner end of the squash for this.) Cut the ends off the courgettes and cut lengthways into thin, about 5mm, slices. Cut the aubergine into 5mm thick discs. Deseed and cut the pepper into large chunks.

Pile the vegetables into a large bowl, drizzle over the olive oil, chilli flakes and season well. Toss the vegetables to lightly cover. I find its easier to use my hands!

Heat up the barbecue and cook the vegetables on each side until golden brown and cooked through. You may need to do this in batches and keep them warm.

Meanwhile place the yogurt and tahini in a bowl. Add the crushed garlic, grated rind of the
lemon and about 3tbsp juice. Season well and beat together until combined. Taste and adjust seasoning if necessary.IMG_4946

Remove the seeds from the pomegranate and finely chop the coriander.

When the vegetables are cooked arrange on a serving plate. Drizzle the dressing over the top and sprinkle over the pomegranate seeds and chopped coriander. Season with a little black pepper before serving. This is great served warm, but any cold leftovers taste amazing too! Serve on its own or with herby quinoa and salad leaves.

IMG_4533
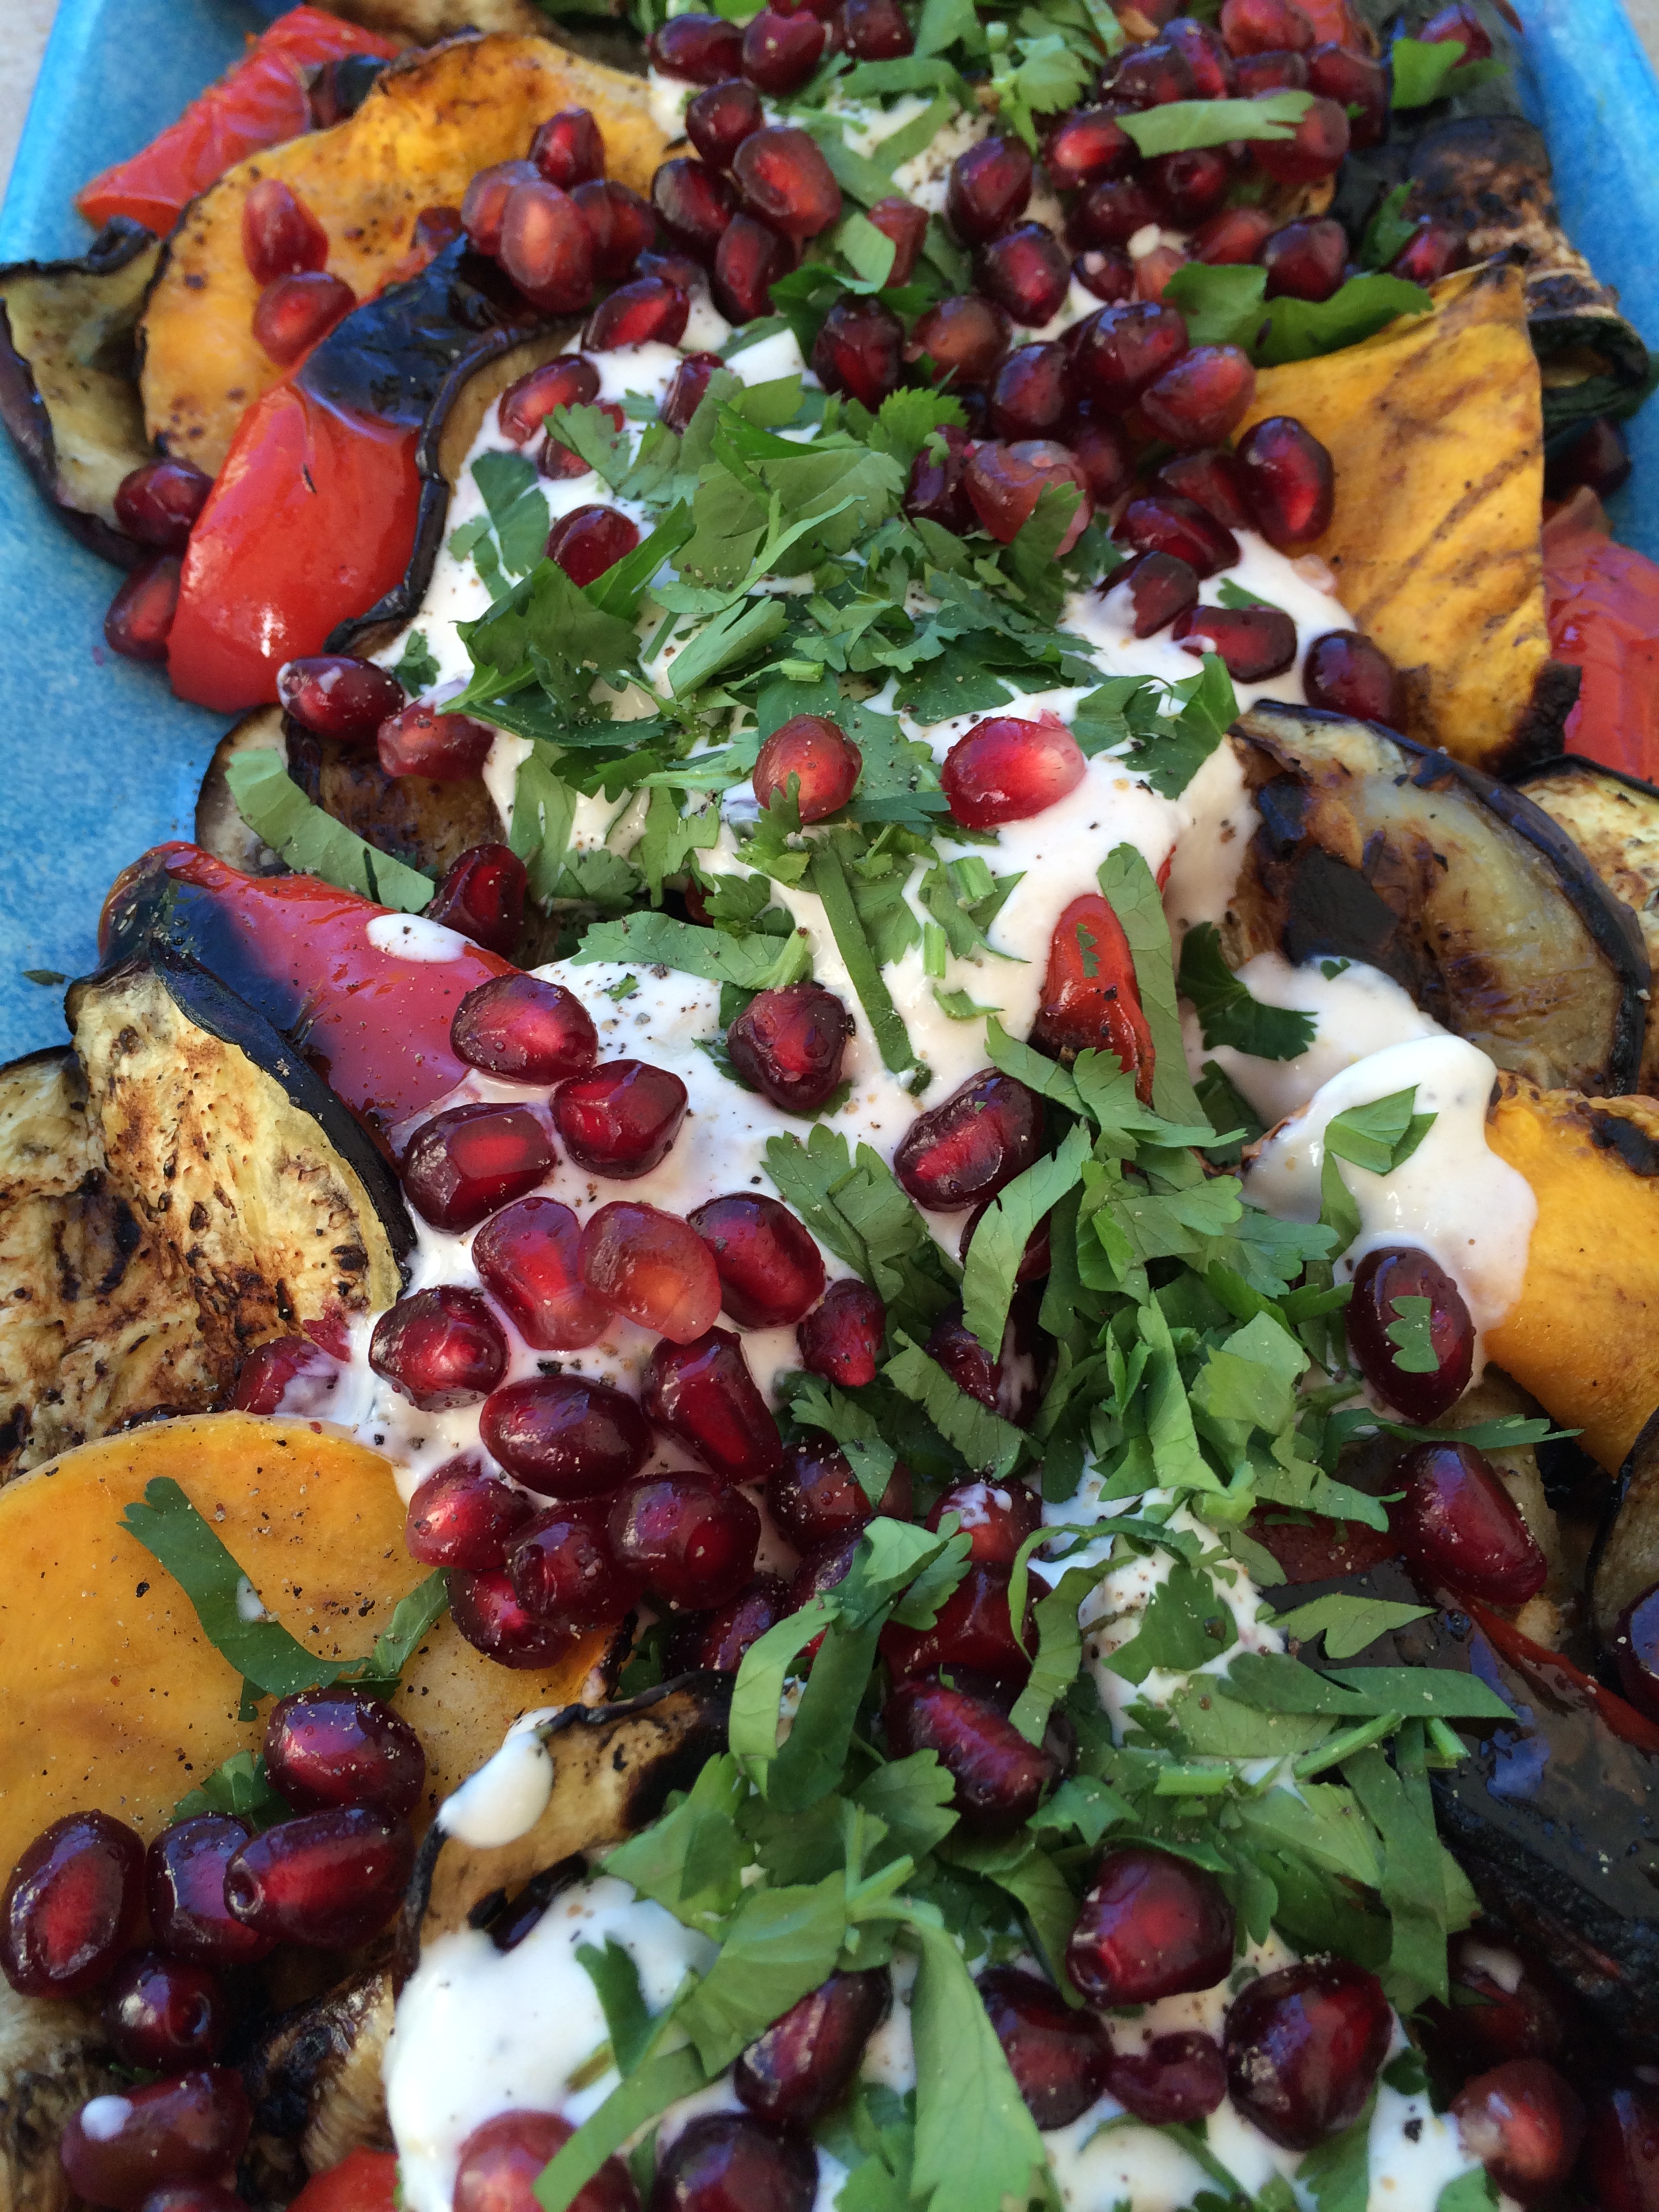
Another great serving suggestion for the Tahini Dressing. Here, (pictured left) I’ve served it with oven roasted butternut squash and a lemony herb and seed quinoa with baby spinach leaves. It’s a delicious bowl of food, great for lunch or dinner. It also packs into a container for a great healthy lunch on the move. You can vary the vegetables depending on whats in season.

Tahini is a thick paste made from sesame seeds, well known as an ingredient in humous. It has a strong nutty flavour and a little goes a long way. Tahini can vary in flavour, the darker tending to be more bitter than lighter brands, so just add a little extra yogurt if you find the tahini too strong. Packed with protein, B vitamins and minerals such as magnesium, iron and calcium its a great addition to the diet. My favourite is Biona Organic Light Tahini but I also always have a jar of Cypressa in my cupboard too.

Festival Bars

IMG_5038

With the festival season in full swing and everyone beginning to enjoy even more time outdoors, I was inspired to make a bar that I could take out in any weather and enjoy a natural energy treat with no guilt!

I wanted to create a bar that had great taste, massive health benefits to refuel long days and nights and colour to remind me of the vibrance of a festival.

I’ve added plenty of nuts and seeds for protein, good fats, minerals and vitamins. Flax seeds for fibre. The dates add a good natural energy kick which shouldn’t spike your blood sugar levels. Ginger for a real zing on the taste buds as well as the benefits it gives in supporting digestion and settling the stomach! Goji berries which are great for supporting the immune system and add the most amazing specks of vibrant orangey red and finally the cacao is packed with great essential minerals, antioxidants and also contains some caffeine! So these bars certainly pack a punch. They’re great as a breakfast bar, a snack on the move or with a coffee, a mid afternoon snack and a perfect refuel after a workout. In fact anytime!!

So easy to make they only take about 10 minutes to whizz together but I’m afraid a food processor is essential as you need a powerful motor to break down the nuts, seeds and dates to help the mixture stick together.

100g blanched almonds

50g pistachio kernels

25g pumpkin seeds

25g sunflower seeds

50g milled flaxseed

275g pitted Medjool dates (weight after stone removed)

2tsp ground ginger

2tbsp raw cacao powder

a generous pinch of Himalayan Pink salt or sea salt

25g dried goji berries

FullSizeRender 3
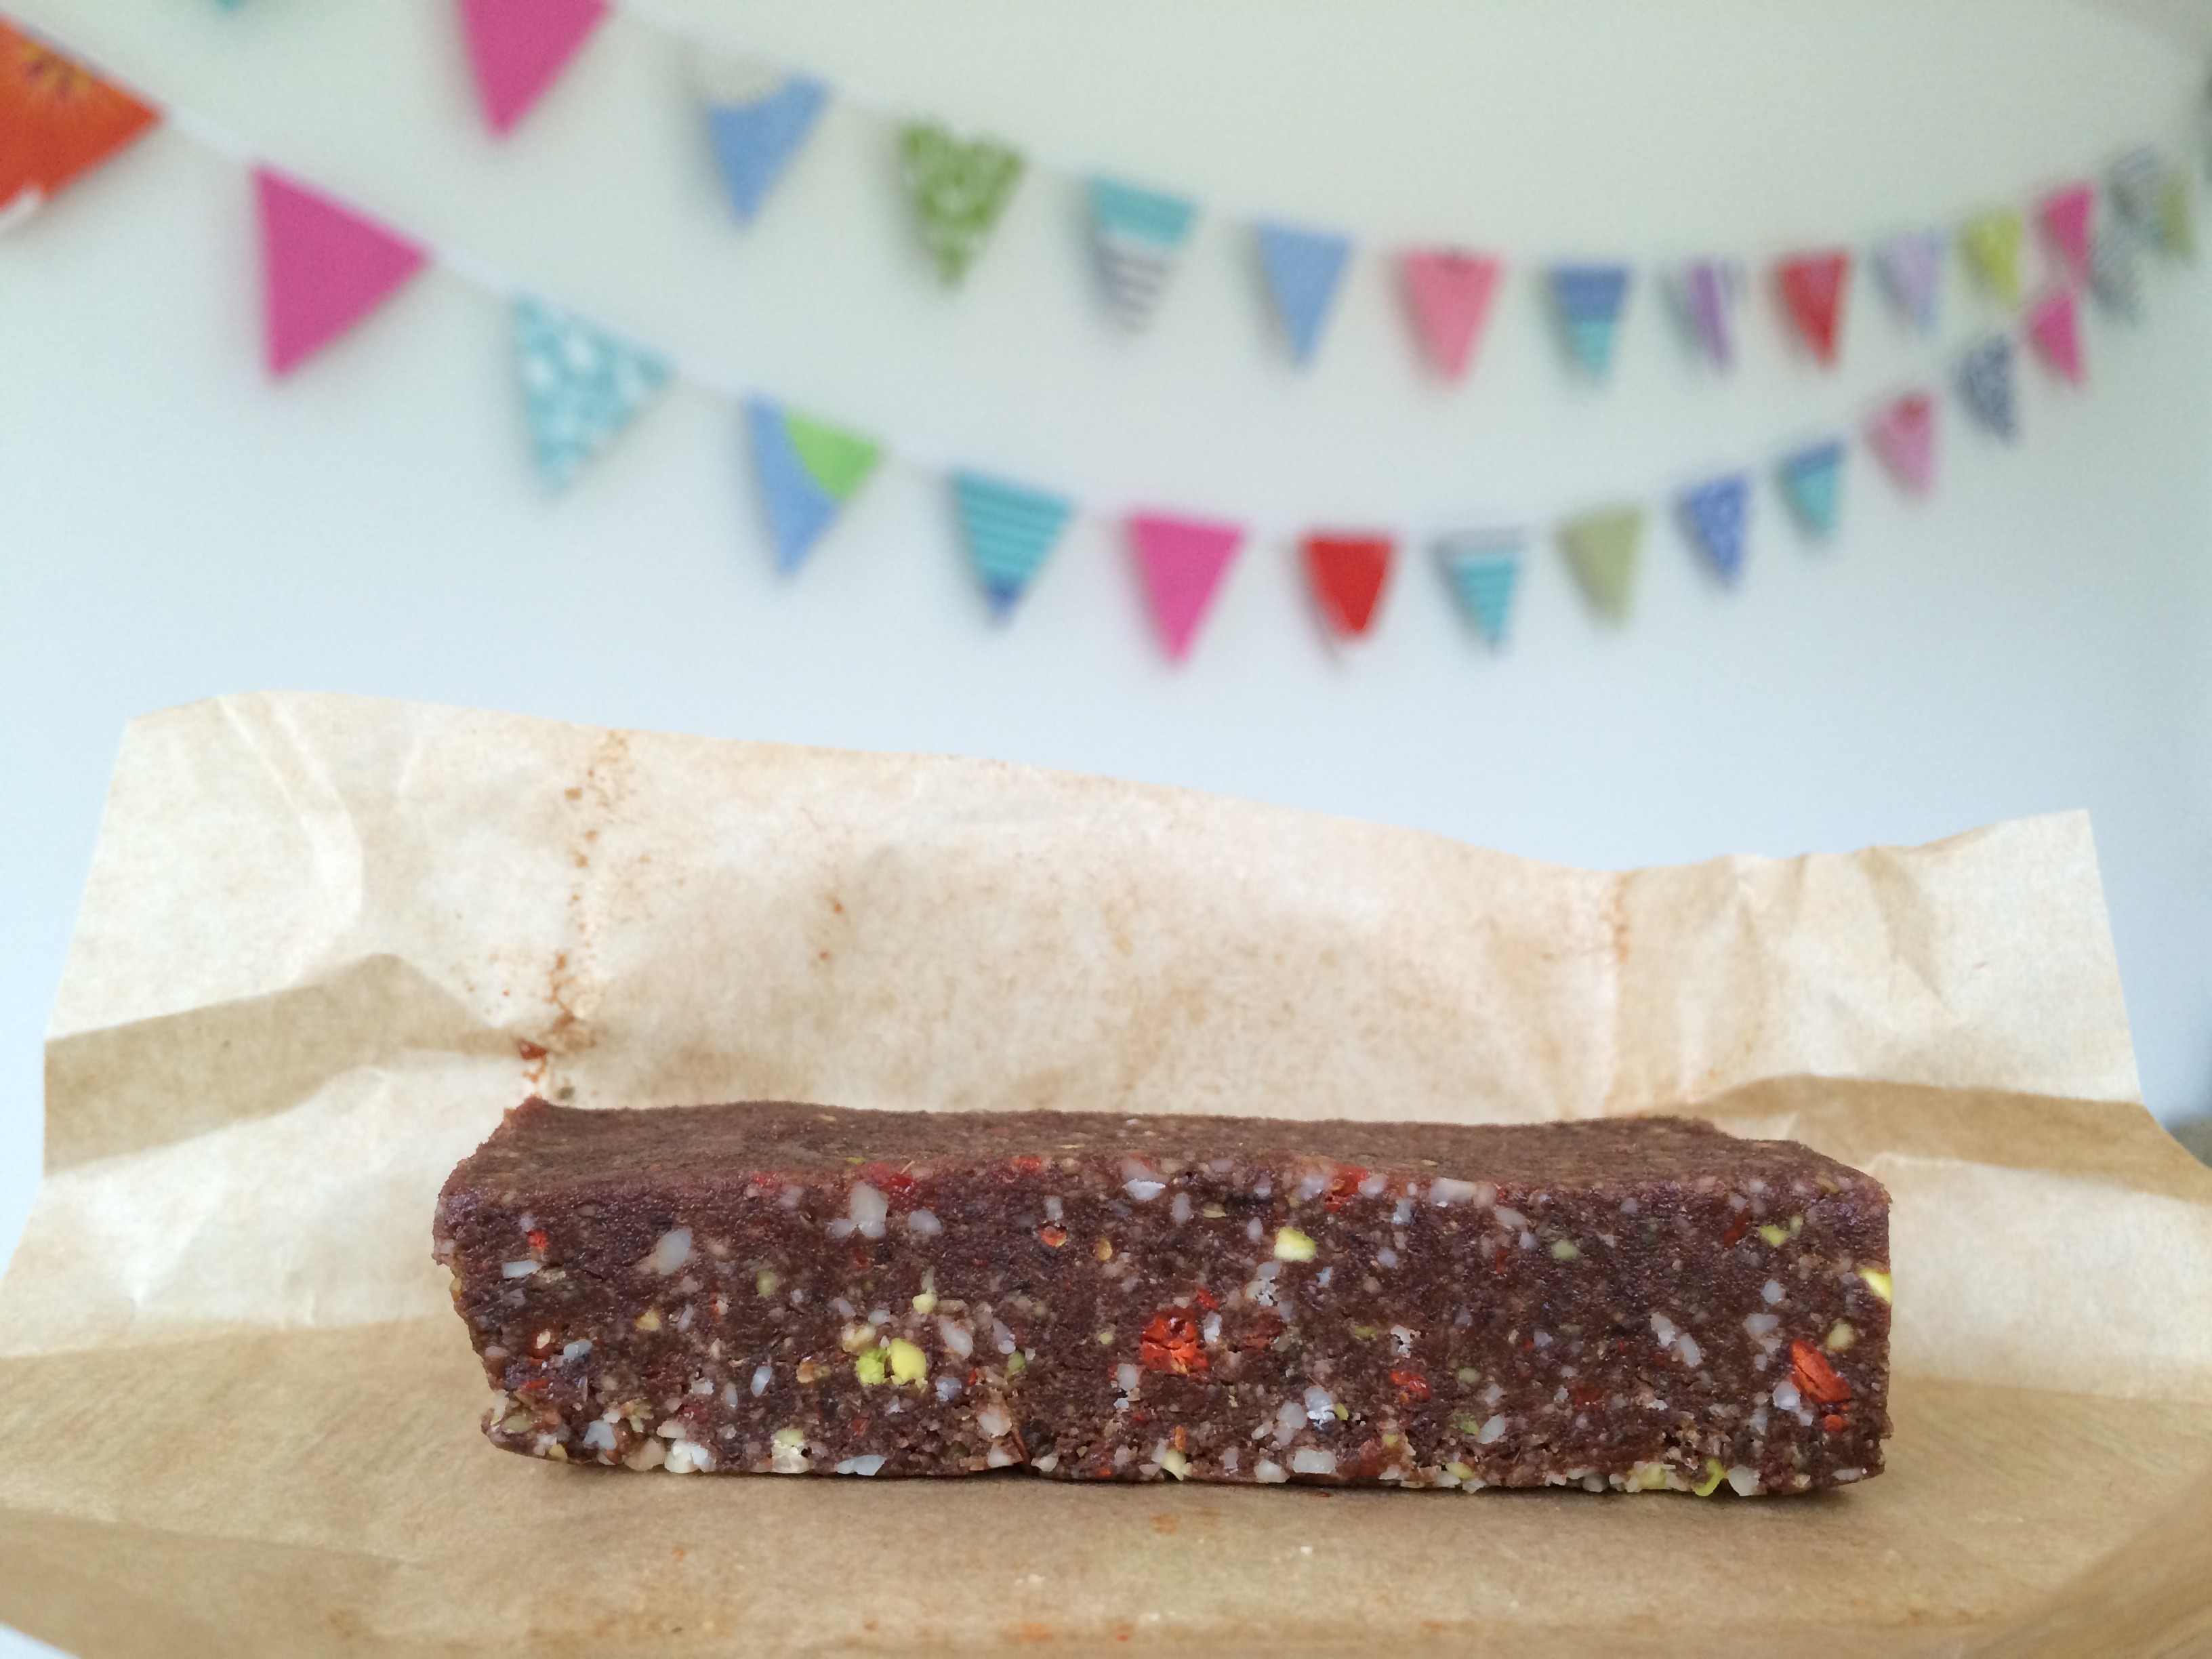
Place the almonds, pistachios, pumpkin seeds and sunflower seeds in a food processor and blend for about 20 seconds until roughly chopped.

FullSizeRender 4

Add the remaining ingredients and blend for about a minute until the mixture looks like fine biscuit crumbs. (pictured below.)

Continue blending for a further 30 seconds to 1min until the mixture begins to come together into pieces of soft sticky dough. Be patient as this may take a little while, as it blends the dates become very soft and sticky and the nuts and seeds begin to release their oils which helps hold the mixture together. (see picture below left)

Spoon the mixture into a greased 7in shallow square cake tin.  If you don’t have a tin this size, then press the mixture into any greased tin to a depth of about 2cm.

IMG_5008

Press  the mixture down firmly with the back of a metal spoon until smooth. The more compact you can press it, the better they will stay together. If the mixture begins to stick then lightly dampen the spoon with a little water. Leave to set in the freezer for about an hour or 2-3 hours in the fridge until firm.

Run a palate knife around the outside of the tin. Transfer the set mixture to a chopping board and cut into whatever size bars or squares you would like! You could even chop them into bite sized pieces.

Store the Festival Bars between layers of greaseproof paper in an airtight container in the fridge for up to 10 days. They are best kept in the fridge but this is not necessary. They also freeze really well. In fact they’re really delicious eaten straight from the freezer as they’re really fudgey when frozen!

I like to wrap them in greaseproof paper with coloured tape to take out and about. You could also lightly dust each bar with a little cacao which will also help prevent the bar from sticking to the wrapper, as it will soften slightly as it gets warmer.

IMG_5009

Goji Berries are gorgeously vibrant, fiery red, thin, oval berries. They’re a Chinese berry that we can buy dried in health food shops and most supermarkets either with the dried fruit or the health food, nuts and seeds.

An extra thought!!

IMG_5059
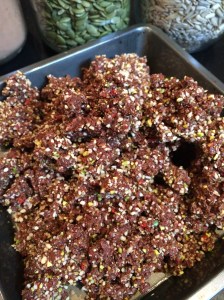
Just had idea of a great way to take these Festival Bars out on the road! Once they have set, cut into bite sized pieces, place in a bowl and dust with a little raw cacao to lightly coat each piece. Transfer to an airtight container to keep them fresh. The cacao stops the pieces sticking to each other and makes them very transportable little bites of deliciousness!!

Thai Aubergine, Squash & Spinach Dal

IMG_4910

Monday 15th June is World Meat Free Day, so I thought it would be great to post this recipe today! The idea is to encourage people to give up meat for just one day to raise awareness of the benefits of eating less meat for a healthier, balanced diet thats better for the planet and food systems.

Naming this dish was tricky! It’s kind of like a soup but more so! Its kind of like a Thai curry but not!! This is another of my go to quick suppers, a complete meal in a bowl! Everytime I make this dish, which I’ve been doing for quite a long time now, its different! I see what I have in the fridge and if I think it will work, in it goes. Finally I’ve got around to writing down the recipe of my favourite version.  That is not to say a few mushrooms or chunks of courgette may still creep in from time to time!

I absolutely love Thai food, the flavours are so exciting and the smell intoxicating. For me Thai food will always satisfy if I’m really feeling like I don’t know what to eat. I think it’s hard to beat a Thai Green Chicken Curry! (which reminds me I’ve got a very old recipe I’ve written somewhere that has become a family favourite. I’ll dig it out and post it on here one day!) This recipe plays on those flavours but doesn’t involve making a paste so is very quick. Try and find fresh lemongrass, it really adds a great flavour. If you can’t you could always use dried lemon grass and follow the package instructions. Failing that add a little lemon rind instead. If you can find fresh lime leaves, pop a couple in with the coconut milk and stock, they add a great flavour too.

Serves 4

2 garlic cloves

2 stalks fresh lemongrass

1 onion

1 red chilli

2tbsp coconut oil

125g red lentils

400ml can coconut milk

1tsp Marigold Swiss vegetable bouillon powder (vegan)

salt and pepper

500g butternut squash

300g aubergine

100g young fresh spinach leaves

5tbsp chopped fresh coriander

juice of 1 lime

sliced red chilli and halved limes to serve

Crush the garlic, cut the stalks of lemon grass in half and bash with the back of a knife to help
release the juices. Peel and finely chop the onion. Deseed the chilli and finely chop.

Heat the oil in a large saucepan and cook the garlic, lemongrass, onion and chilli for 2 minutes, stirring occasionally. Rinse the lentils and add to the pan and cook over a medium heat for a further 2 minutes. Add the coconut milk, refill the empty can with water and add this to the saucepan with the bouillon powder and season with salt and pepper. Bring to the boil, cover and simmer gently for 15 minutes. Stir occasionally.

Meanwhile, peel the butternut squash and cut into 2cm cubes. Add to the saucepan, cover and cook for 5 minutes.

Wash and cut the aubergine into 2cm cubes, add to the pan, cover and cook for a further 5 minutes, stirring occasionally.

Add the spinach with the fresh coriander and simmer gently for 2 minutes until the spinach begins to wilt.

Add the lime juice and gently stir. Serve in IMG_4885
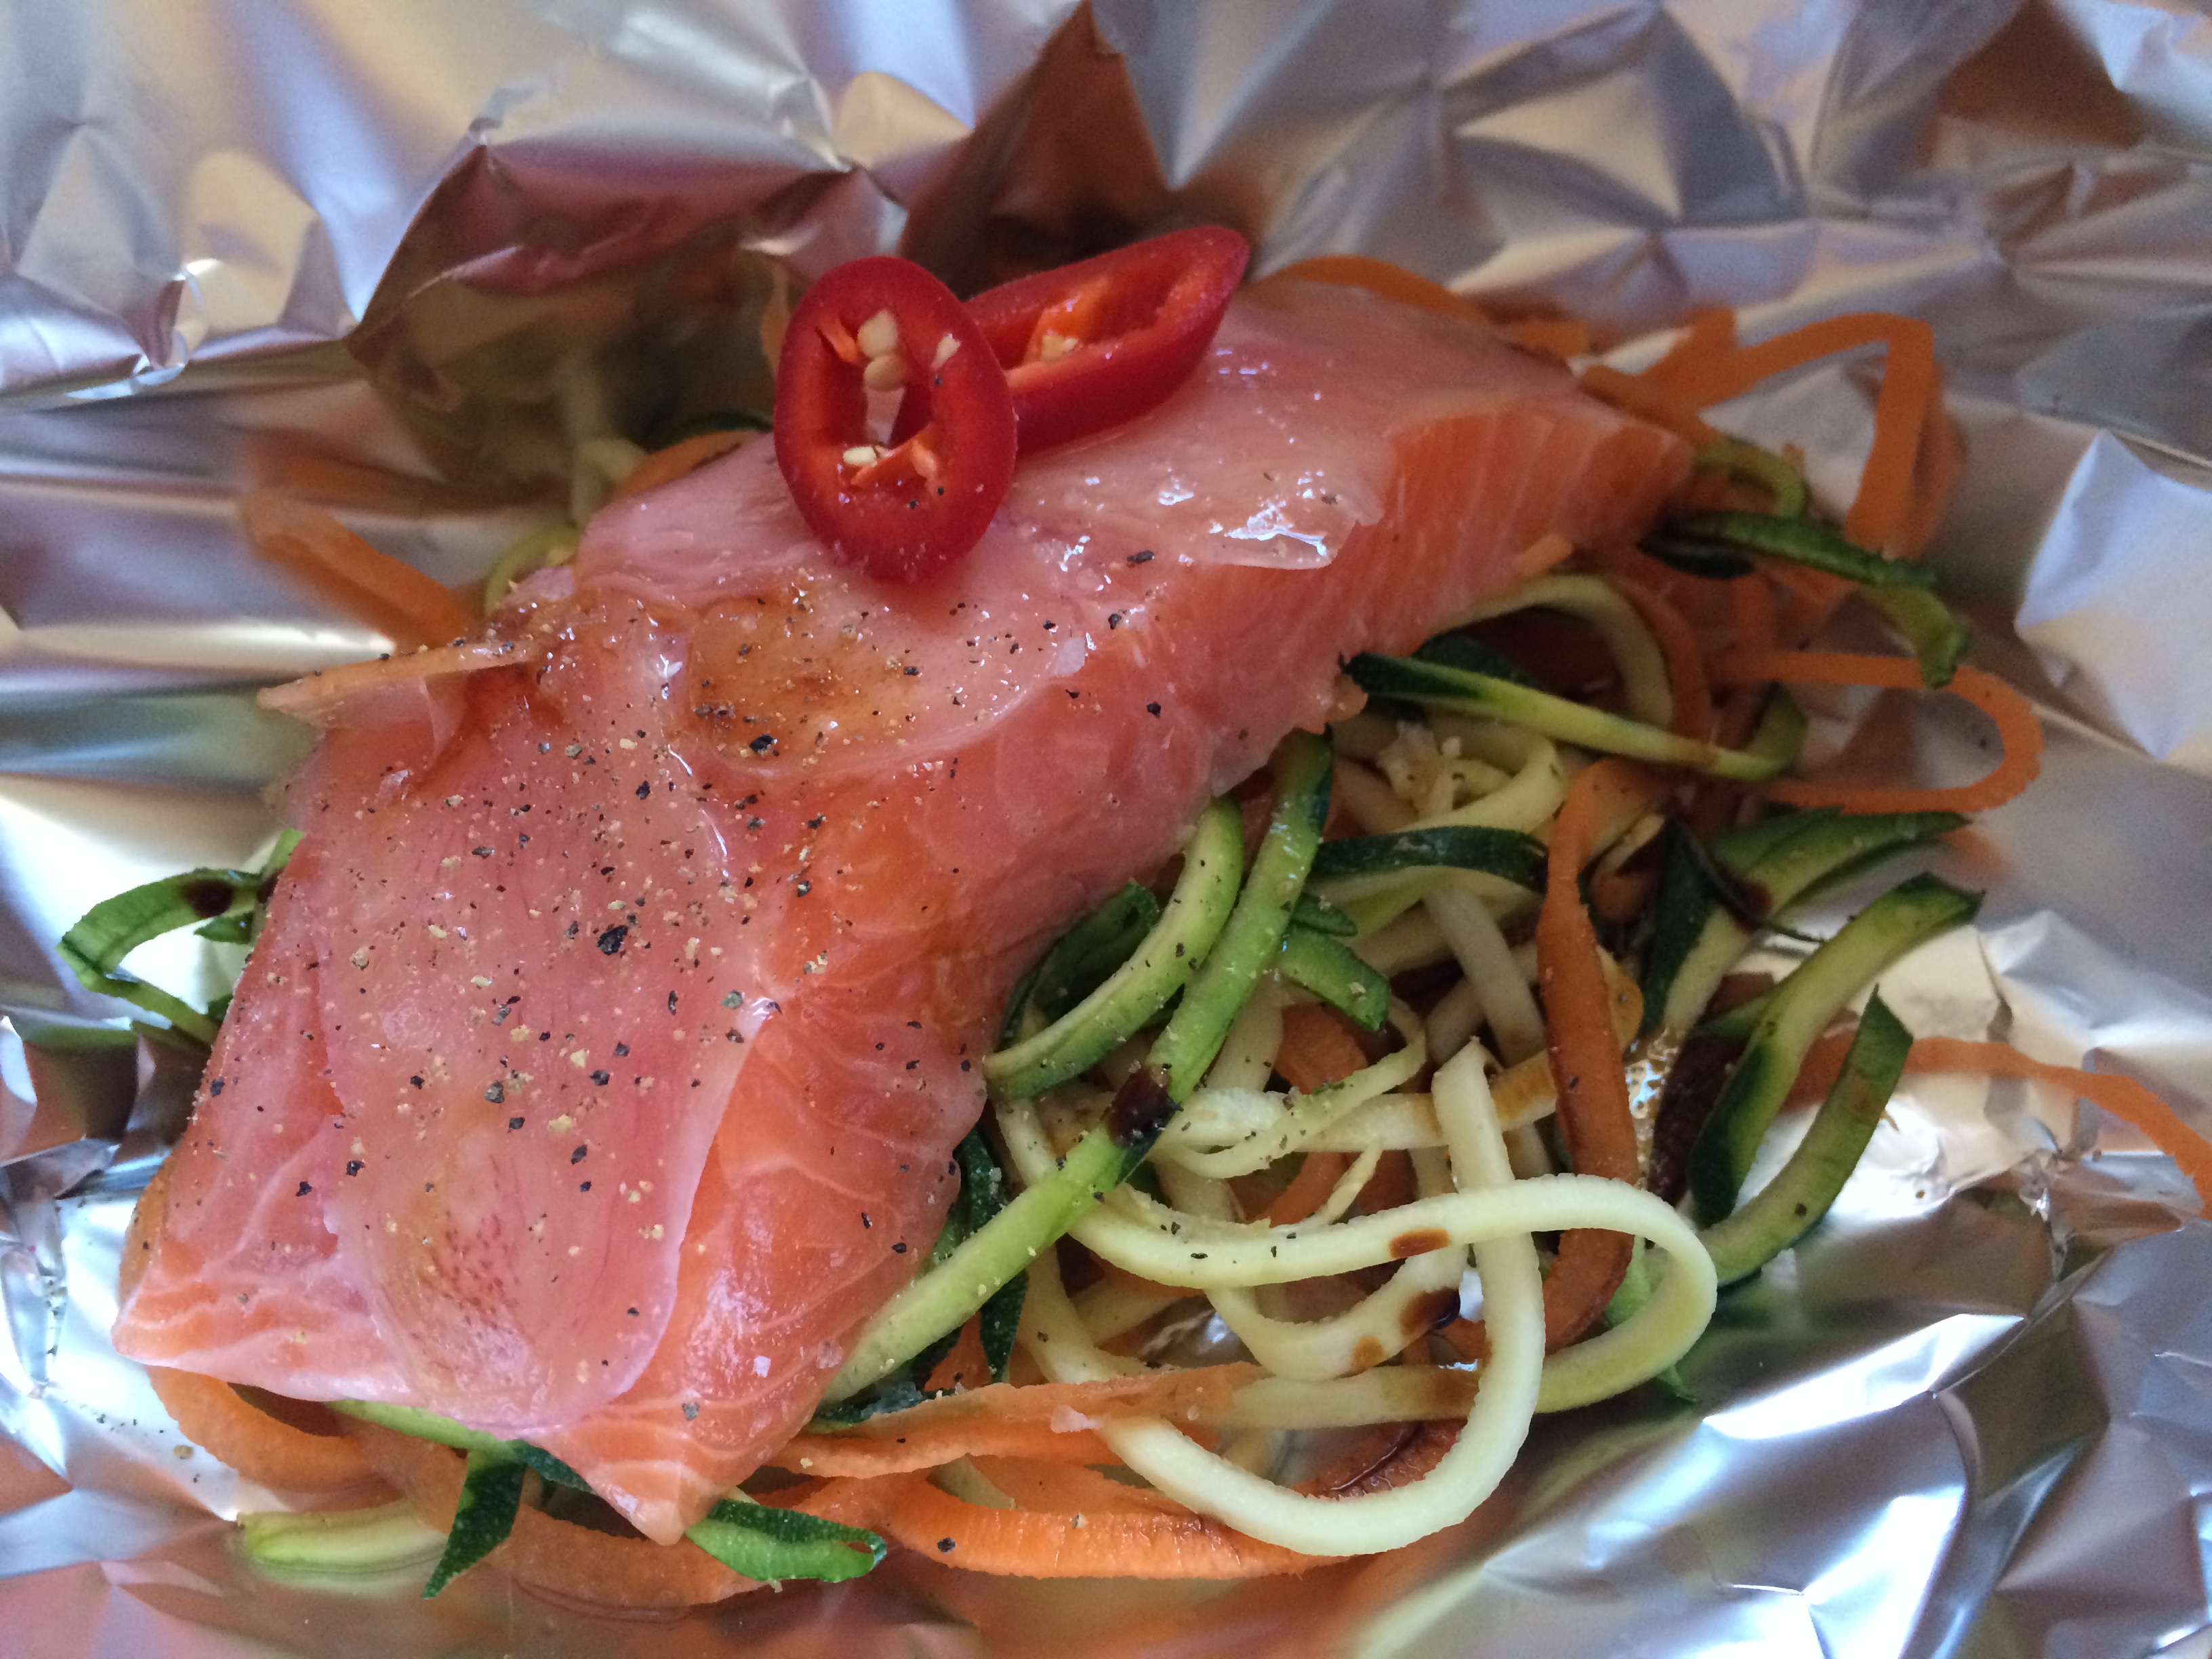
bowls with a few chopped chillies on top and halves of lime to squeeze over.

I love a bowl of this on its own, but to make a more substantial meal serve with some steamed brown rice. I tend to serve this with the lemongrass but you could always remove it before serving!

This dish really holds its heat but, like most Thai food, is just as delicious served lukewarm! It keeps really well, simply cool completely and store in an airtight container in the fridge for up to 2 days. Reheat over a very gentle heat, stirring occasionally until piping hot.  You may find the vegetables soften a little more but you’ve still got a bowl full of amazing flavours!

Speedy Salmon Parcels

IMG_4853

These salmon parcels make a great family meal. Cooking in a parcel allows the fish and vegetables to gently steam, locking in all the delicious flavours and nutrients. The fish cooks to the point where it will just begin to fall away in lovely big flakes minimising the risk of overcooking.

Seasoned with ginger, lemon and tamari, these were a hit with the family. Some went for the chilli, others decided not to eat it but I’d suggest cooking them in the parcel as it adds a little extra flavour. These would also make a perfect quick lunch. I’ve given enough ingredients to make 4 parcels but the recipe is very easy to adjust to make as many parcels as you like.

about 200g carrots

about 200g courgette

Four 150g pieces salmon fillet, skinned

sushi pickled ginger

1 red chilli

4tsp lemon juice

2tsp tamari

salt and pepper

Preheat the oven to 190ºC. Tear four large sheets of foil, each about 35cm square.

Peel the carrots, cut the ends off the courgettes IMG_4835
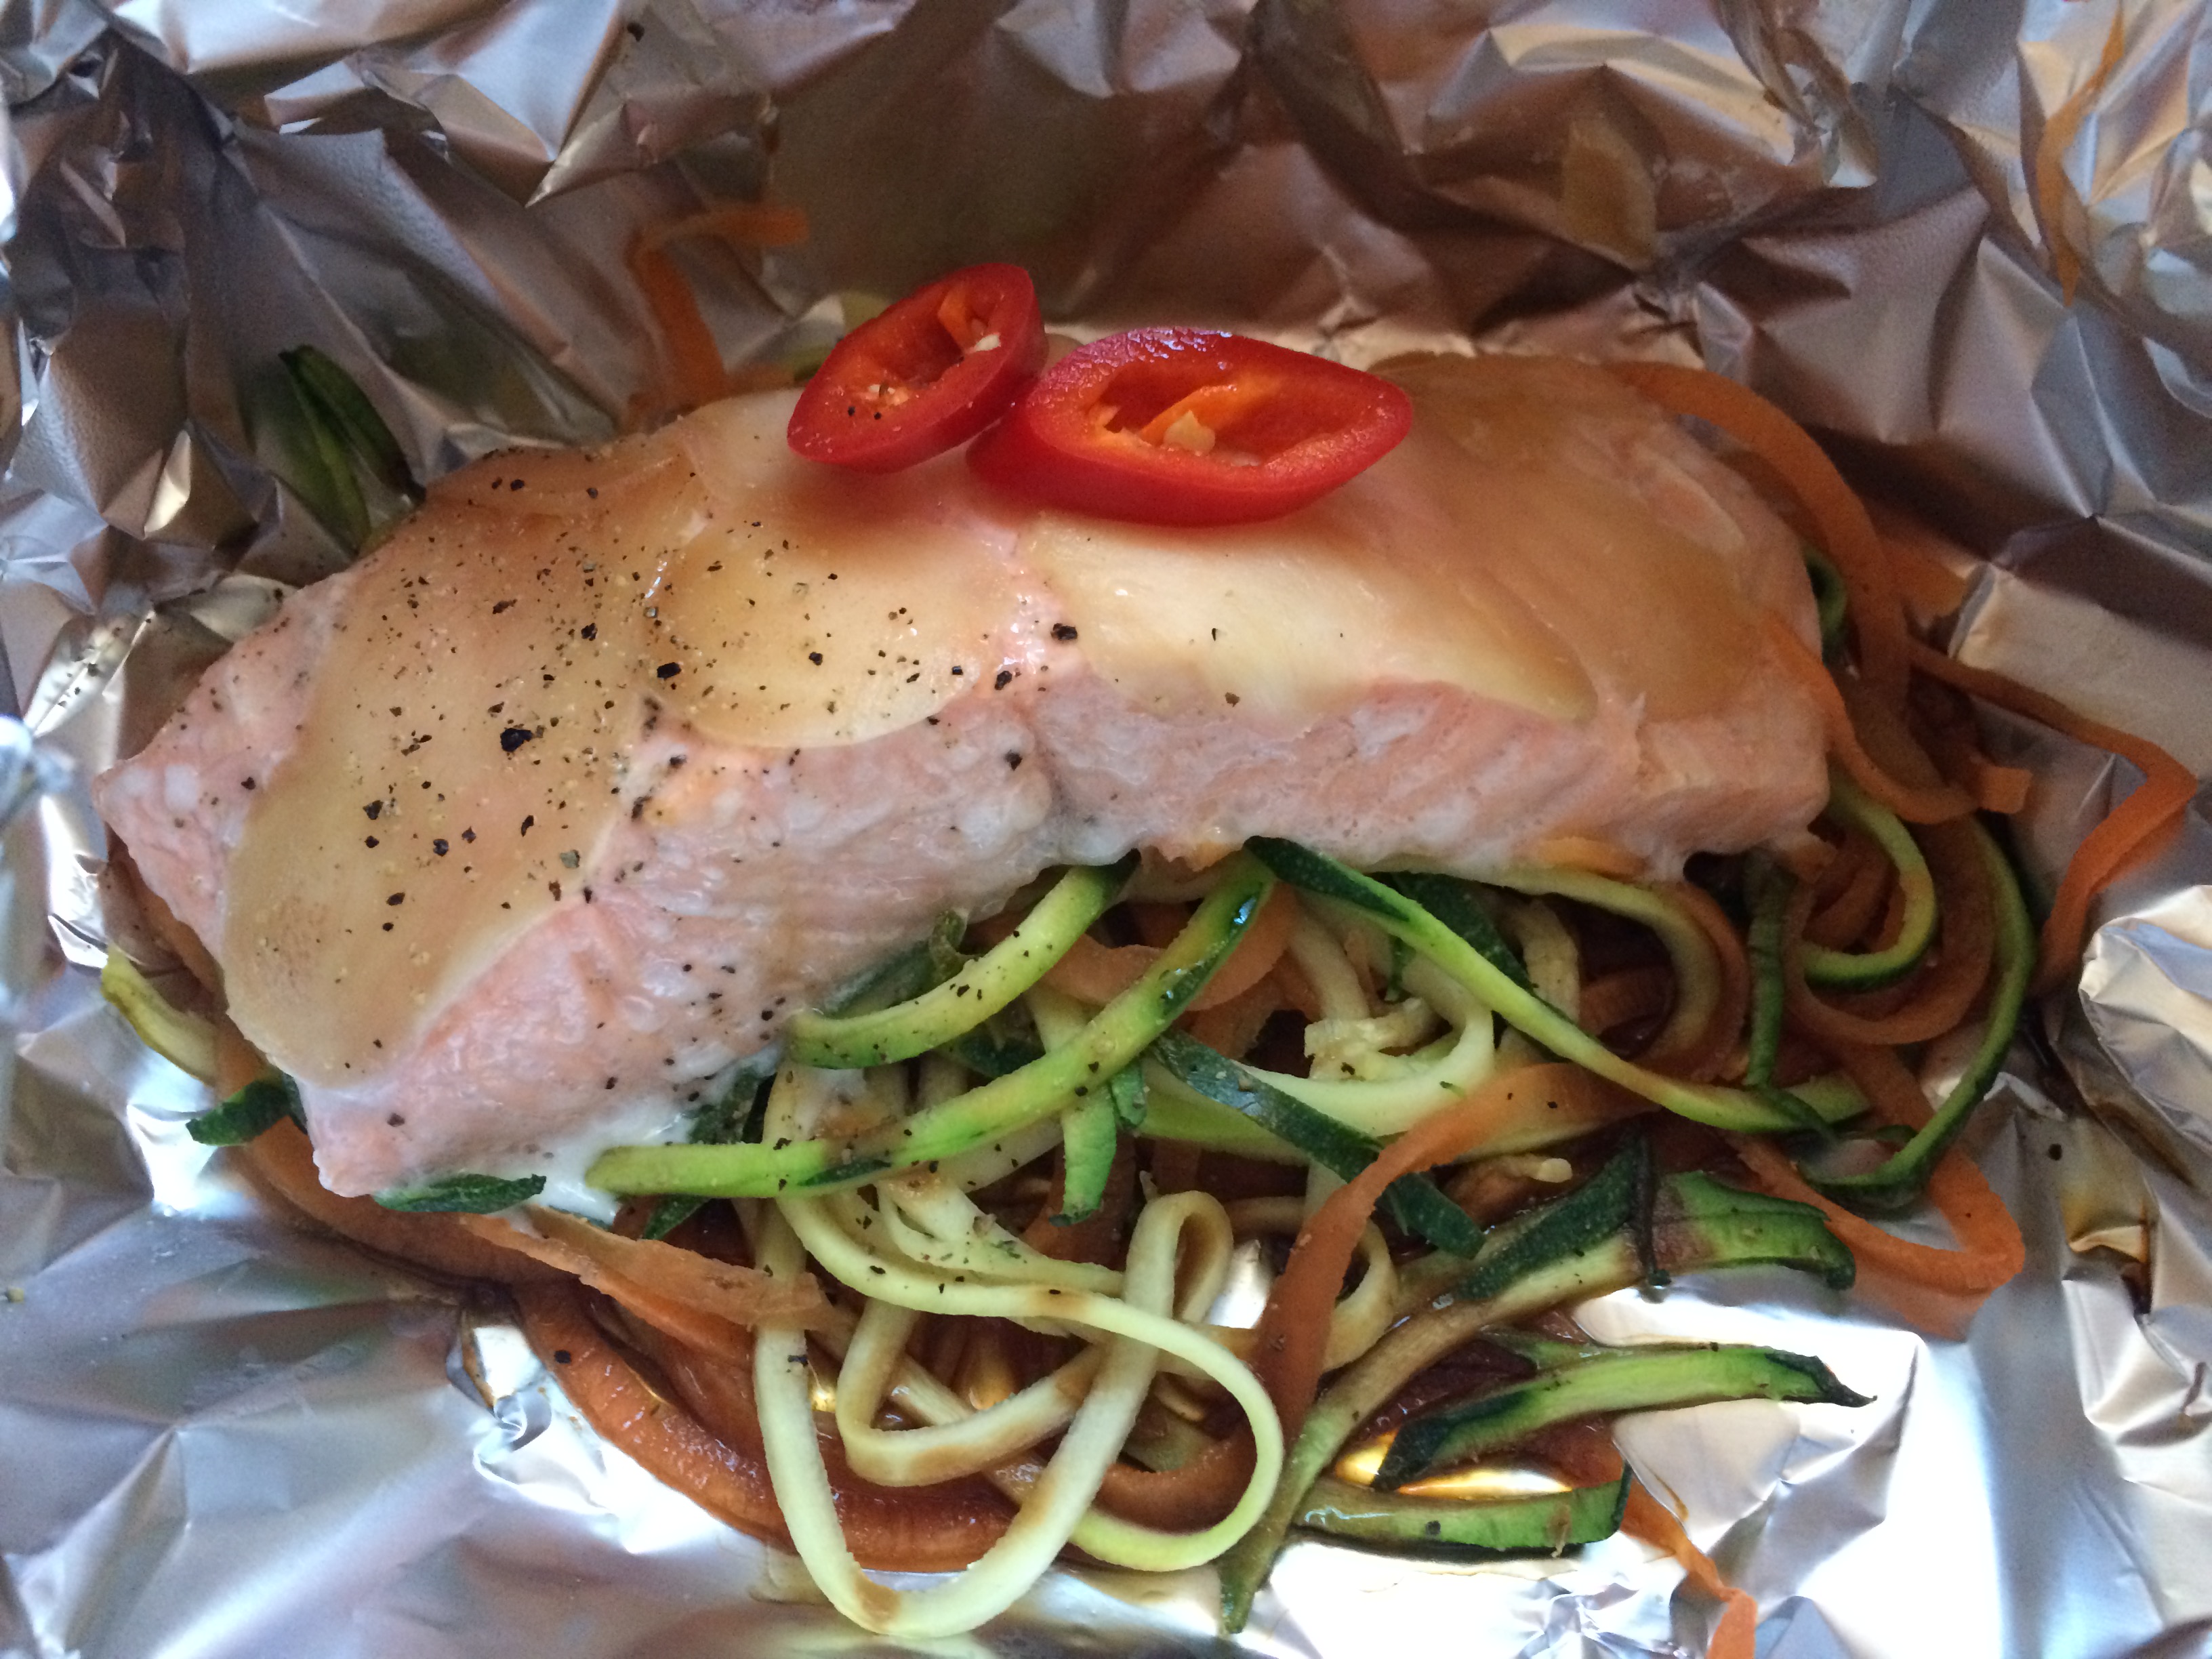
and spiralize into noodles. (see hint at end) Place a quarter of the vegetables in a small mound in the centre of each foil square.

Skin the salmon and place on top of the vegetables. Cover each fillet with the wafer thin slices of sushi ginger to cover. Thinly slice the red chilli and place two pieces on top of each piece of fish.

Spoon a teaspoon of lemon juice and half a IMG_4838teaspoon of tamari over each piece of salmon and season well with a little salt and plenty of black pepper.

Fold each parcel up to enclose the filling, folding over the top and sides to make sure each parcel is sealed well so the juices can’t escape. Place them on a baking sheet.

Cook for 15 minutes until the salmon is just cooked through. You could serve these in the parcel or gently tear the foil and slide the contents and any juices onto a warmed plate.

The salmon parcels are delicious served with brown rice, although my family love pesto rice and thats great with it too! Add some steamed tenderstem broccoli and you’ve got an amazing meal.

Hints

Tamari is a Japanese gluten free soy sauce which has a delcious flavour similar to soy sauce but slightly richer and not so harsh, in fact I prefer it to soy sauce. It’s available in supermarkets and health food shops. If you haven’t got any try using a light soy sauce instead.

Sushi pickled ginger is wafer thin slices of ginger marinated in vinegar and sugar and is available in most supermarkets in sachets or jars, usually in the Oriental food section.

Click here to take a look at the spiralizer I use for the vegetables. If you haven’t got one, then finely shred your vegetables into very thin pieces, they need to be thin to allow them to cook in such a short time. It may take a little longer but it’s worth it!

Asparagus with Parmesan, Chilli & Lemon Oil

IMG_4804

In my last ingredients post about chilli flakes, I made some suggestions on how to use them which got me thinking about asparagus!  So tonight I served steamed asparagus with shavings of Parmesan cheese, a sprinkling of chilli flakes, toasted pinenuts and a good drizzle of lemon infused olive oil, seasoned with black pepper and a little sea salt. Simple and delicious. Great to try whilst asparagus is still in season!

This is great on its own but would also make a great accompaniment to grilled meats and fish or try topping with a poached egg for a more substantial lunch. You could also barbecue your asparagus instead of steaming, just brush with a little oil before cooking.

Chilli Flakes

IMG_4775

You may notice that I like using chilli flakes in my recipes! Adding a little chilli to our food whether fresh or dried is so good for us. For me, its the intense little bursts of heat that chilli can give a recipe that I love!

Chilli flakes are crushed dried chillies whereas chilli powder is made from dried chillies which are then ground down into a fine powder. When the chillies are dried the flesh turns a lovely intense orangey red, so the flakes add a great splash of colour to whatever you’re cooking. Don’t worry about the seeds, they’re not as fiery as you might think. This is because the seeds are not actually the hottest part of the chilli, but it’s in fact the white membranes that attach the seeds to the flesh that contains the heat. The great thing is, you can add a little at first and if you’d like to turn up the heat then just sprinkle over a little more!

I often add chilli flakes to roasting vegetables or sprinkle a pinch over a salad for a little extra spice, they’re especially good in lentil and bean salads. Equally good in marinades, they add a really delicious flavour when mixed with coriander seeds as a rub for a barbecued leg of lamb or dress a bowl of chargrilled vegetables with some chilli flakes, olive oil and balsamic vinegar. Try them as a garnish, sprinkled over some humous with a little olive oil or over freshly cooked asparagus with lemon oil and shavings of Parmesan cheese.

I know how frustrating it can be to buy an ingredient only to find you need it for one recipe after which it sits on the shelf slowly going past its sell by date. Well I’ve never had that problem with a jar of chilli flakes! I really think they’re a perfect store cupboard ingredient. You can find them with the dried herbs and spices in most supermarkets or you could think about drying some chillies yourself and crushing them in a pestle and mortar. Store them in an airtight jar to keep in the flavour.

IMG_4346

When you want to add a touch of heat to a recipe and you don’t have any fresh chillies in the fridge and using chilli powder would add a rather disappointing powdery dusting, thats the time to use dried chilli flakes. Over the coming months I will be adding many more tasty recipes using chilli flakes so look out for them by clicking the tag for ‘chilli flakes’ on the sidebar or typing it into the search box! But for now you can find them in these recentIMG_4601 recipe posts; IMG_4696Mozzarella, Parma Ham & Mango Salad (pictured left), Quinoa, Feta & Pomegranate Salad (top right) and my Parmesan Crisps (bottom right)