Latest Posts

Mozzarella, Parma Ham & Mango Salad

IMG_4696

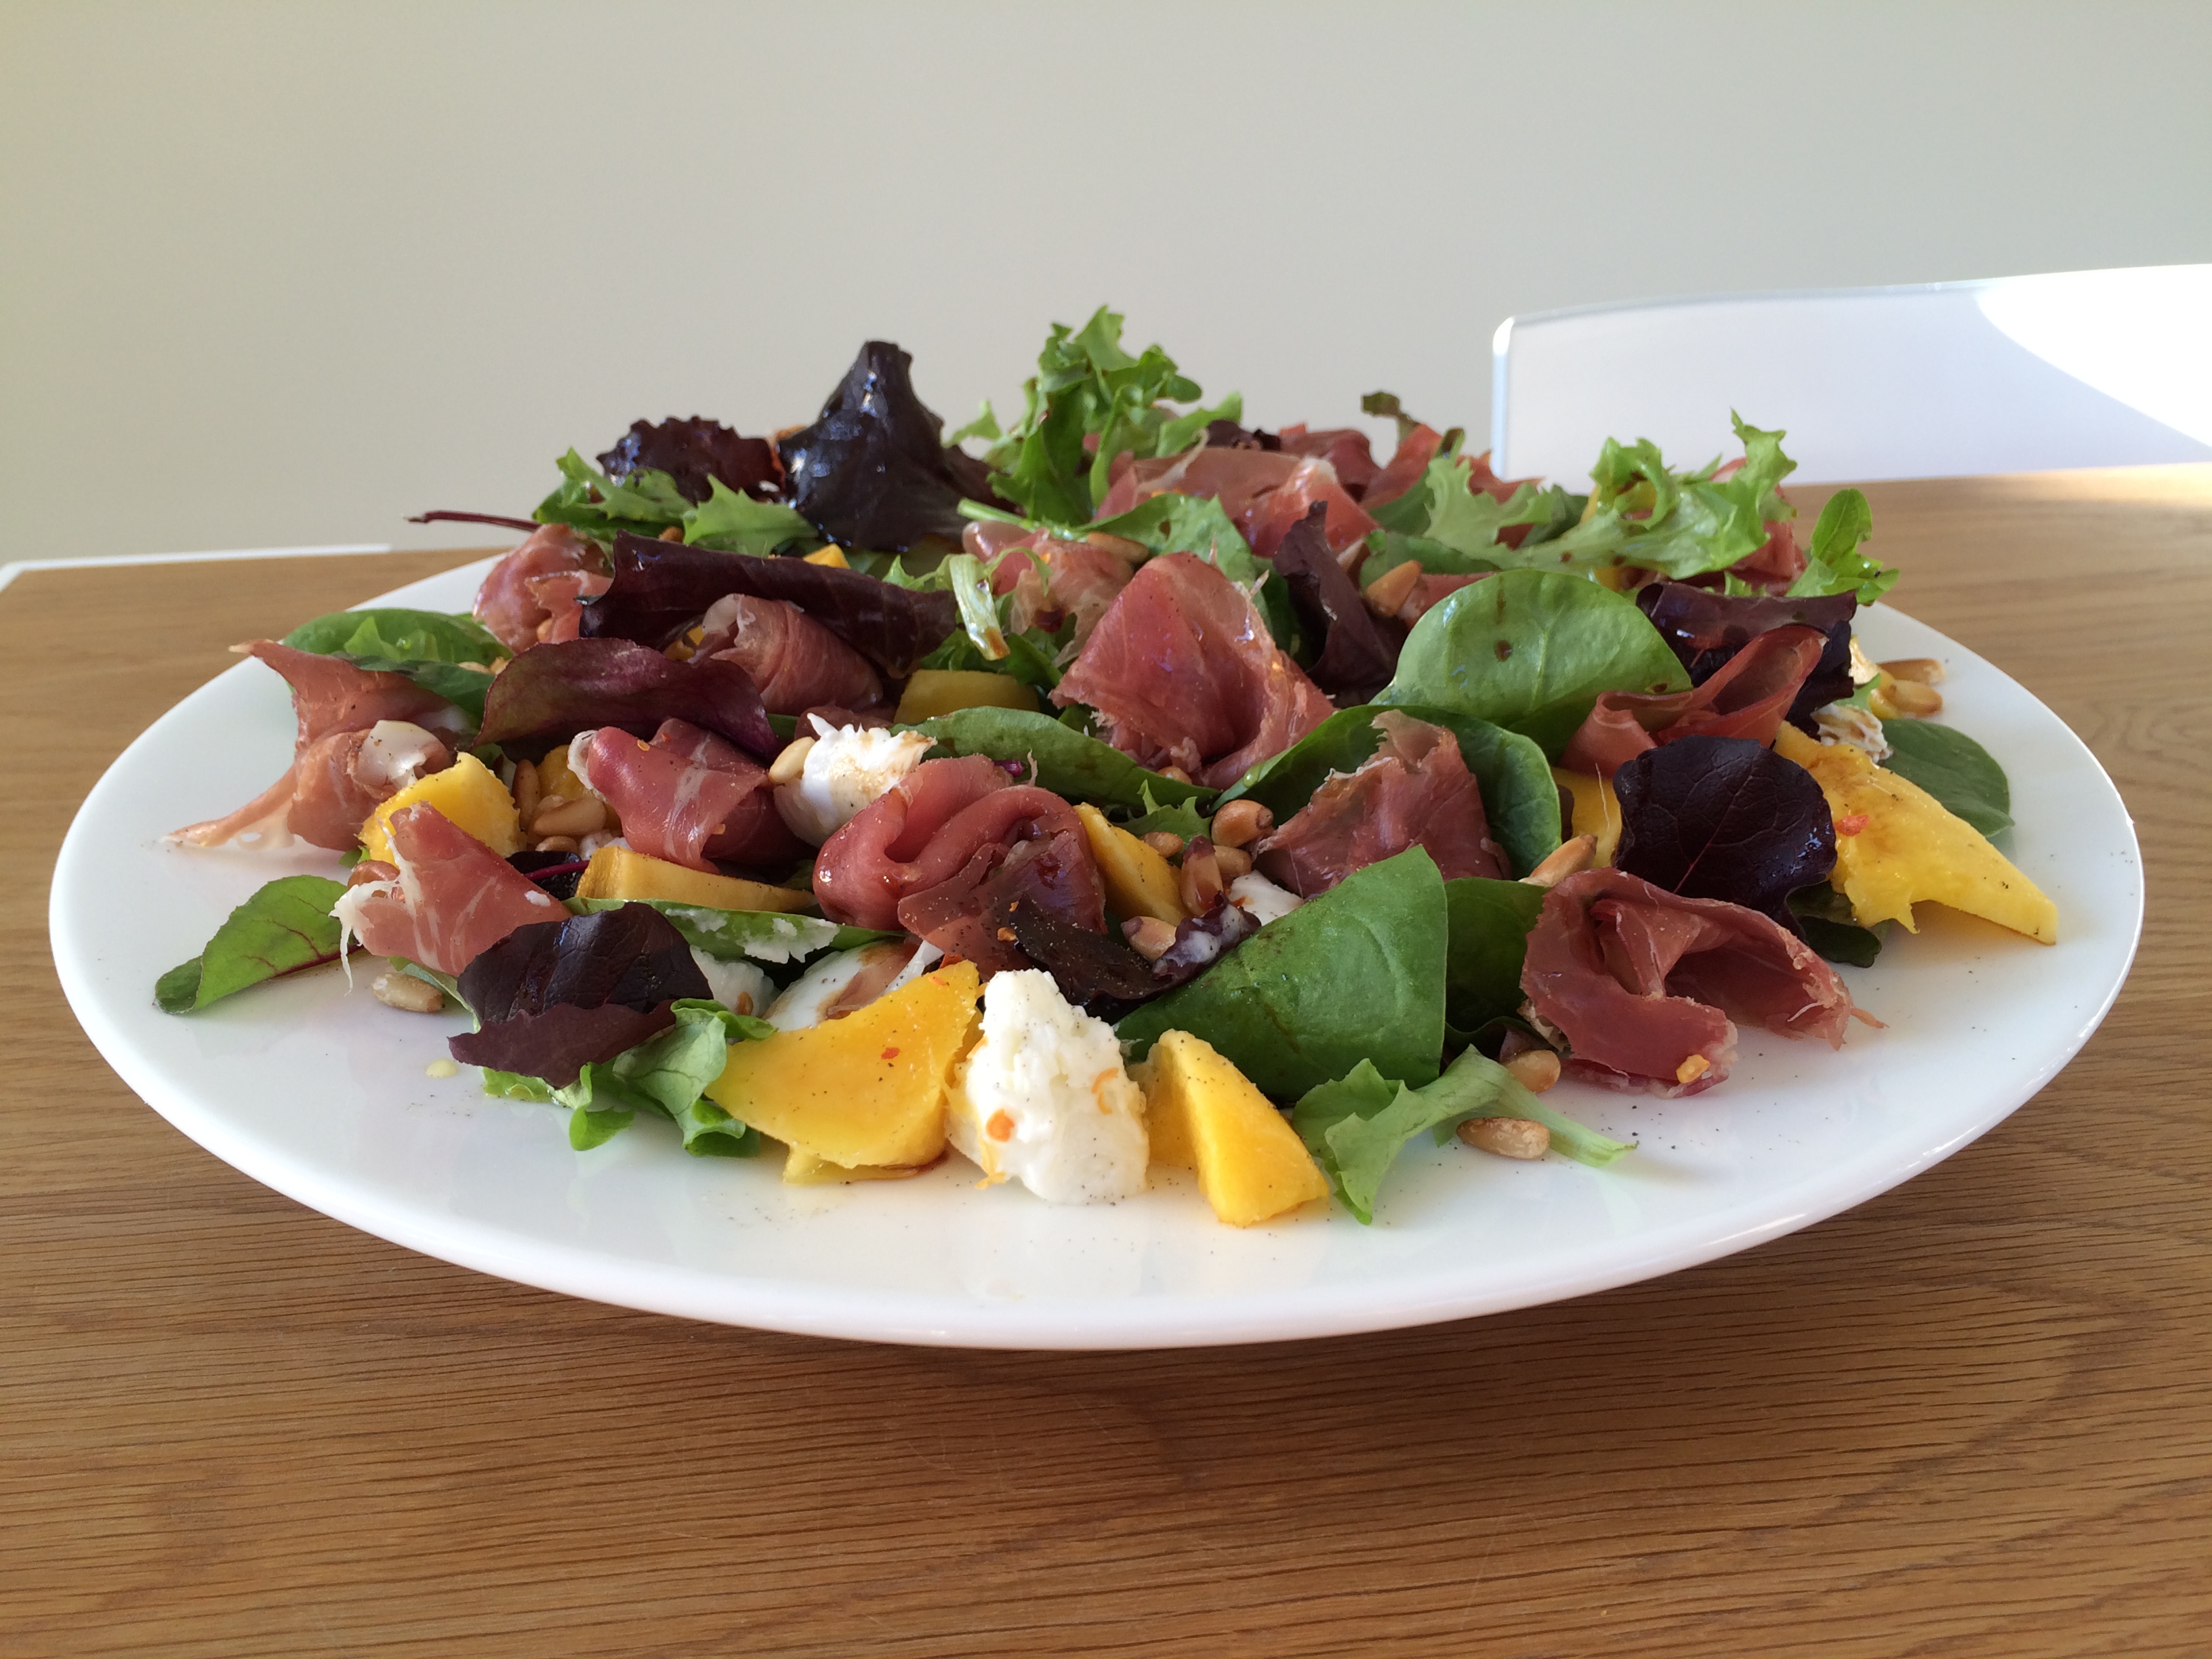
I’ve been making this salad for a while now and I’m so pleased its become a family favourite. Its the easiest salad to put together and is really packed full of delicious flavours. This is one of those recipes that look like you’ve spent ages in the kitchen but with a few great ingredients you can serve something amazing really quickly! I find a good plateful of the salad is enough for me but would usually serve it with a big bowl of pesto pasta to fill up the family!  It would also make a perfect summer lunch served with crusty bread or a good gluten free alternative such as a herby quinoa salad.

I’ve chosen to use Parma ham but any other Prosciutto (Italian cured air-dried ham) would be great too. I’ve used one of my favourite ingredients, dried chilli flakes, in this recipe, I find the children enjoy a small amount but you could just sprinkle half the salad with chilli and let them tuck into the the chilli free half!

You can vary the quantities depending on how many people you’re serving.  To give you a guide I tend to find, to serve 4, a bag of salad leaves, 1 ripe mango, 2 balls of mozzarella and 1-2 packets of Parma ham is enough. You’ll also need some pinenuts, dried chilli flakes, lemon olive oil and balsamic vinegar.

To make the salad, choose a big serving platter and scatter the salad leaves over the plate.

Drain the mozzarella well and break into small pieces, tear the Parma ham into pieces and tuck in-between the salad leaves with the mozzarella.

Remove the stone from the mango, cut the IMG_4679flesh away from the skin and chop into chunks. Arrange over the salad.

Lightly toast the pinenuts, cool and sprinkle over the salad with a generous pinch of dried chilli flakes.

Just before serving drizzle the salad with lemon oil and balsamic vinegar and season with freshly ground black pepper.

Handy Hints

IMG_4704Lemon Infused Olive oil has the most amazing flavour.  Try and choose one that has been pressed with the lemons as it has a much better flavour than one that has had lemon added to it after pressing. Its quite expensive, about £9 a bottle, but a little goes a long way! You could also use it to dress cooked vegetables, drizzle over the top of a bowl of summer vegetable soup such as my Pea & Watercress Soup or over freshly grilled or BBQ seafood.

I’d highly recommend Buffalo mozzarella as the flavour is so good. If you can’t find it, any mozzarella that’s sold in brine is still perfect!

Skinny Witch and Parmesan Crisps

IMG_4628

Whether you’re celebrating the fact it’s a Bank Holiday weekend, school half term, that we’re half way through GCSE exams or just that its Friday I think it’s time for a treat!  I’ve been enjoying this drink for a long time, its so refreshing but with a great kick!!  I only found out the other day that its called a Skinny Witch, probably because it doesn’t have any added sugar in it! Another one of my big weaknesses is savoury snacks, and these parmesan crisps are great with a drink and so quick and easy to make. They’re also quite rich so you don’t need to eat too many! Have a great weekend!

IMG_4607 2Skinny Witch

I’m not going to give quantities as everyone probably likes a their drink a different strength drink so I’ll just talk you through how I make mine.

Squeeze the juice from a lime and add to a long glass with 3 or 4 ice cubes, add a good measure of vodka and top with sparkling mineral water. I then add another chunk of lime and sometimes a sprig of mint.  Obviously you can balance the flavour to your taste with extra lime or vodka!

Parmesan CrispsIMG_4615

Its important to use a good quality Parmesan cheese for this recipe, the prefaced finely grated cheese or the very smelly long life parmesan in tubs will burn when used in this recipe.  So, its best to buy a chunk of Parmesan and grate your own. Its the melting cheese that holds these crackers together and makes them crisp.  Baking cheese in this way will create a strong toasted cheese smell so it may be best not to make these just before people arrive! If you can’t get fresh thyme, try using fresh marjoram or oregano.

100g freshly grated Parmesan cheese

a handful each of pumpkin and sunflower seeds

dried chilli flakes

2tbsp chopped fresh thyme

black pepper

IMG_4594Preheat the oven to 220ºC.

Line 2 large baking sheets with non stick baking parchment or the Bake-O-Glide as shown in the picture.  Pile heaped teaspoons full of parmesan cheese on the baking sheets leaving plenty of room between to allow them to spread.

Sprinkle a few pumpkin seeds and sunflower seeds over  each cheese stack with a few flakes of dried chilli to taste and a little chopped fresh thyme.  Season each one with a little black pepper.

IMG_4601

Place in the oven and bake for 4-5mins until bubbling and golden brown. The cheese will melt and spread into small round crisps and the seeds will begin to toast.

Remove from the oven and allow to cool for a minute before removing from the baking sheet with a palate knife.  Serve immediately or cool completely on a wire rack and store in an airtight container for 4 days.

This makes about 24 Parmesan Crisps

You may want to leave out the chilli for children as they give quite a spicy kick! These are also great served with a soup or for garnishing a risotto.

Sweet & Salty Vanilla Popcorn

IMG_4587

Popcorn is a perfect healthy snack and seems to be making a huge revival. In fact it may be as popular as ever with so many different flavours, sweet and savoury, appearing in the shops. If you choose a brand thats selling proper popcorn these are generally good but check the ingredients list carefully as some can be packed full of fat and sugar which make it pretty unhealthy and dare I say it, microwave popcorn is not a great option!

In the quest for a healthier revision snack I’ve started making popcorn for my children to eat as they study. I knew a sweet popcorn would be favourite, so I’ve used coconut nectar as a sugar alternative, it has an amazing caramel flavour is natural and unrefined. It also has a lower Glycemic Index compared to regular sugar which means it shouldn’t peak blood sugar levels and therefore keeps energy even, helping avoid the sugar highs and lows which can affect concentration. Coconut sugar may also retain some of the nutrients found in the coconut palm. Cooking in coconut oil as well as adding a great flavour also adds some healthy fats.

I’ve tried various methods and find this one works best for me.  Here’s a few hints before you get started. Make sure you use the biggest pan you can as its best to have the corn in as thin a layer as possible and it needs plenty of space to expand in to! If you want to make double, its really best to make it in two batches as this way you’ll avoid being left with loads of un popped kernels or overcooked popcorn and you’d also need a pretty massive pan to fit it all!  Finally, please don’t be tempted to tip the flavouring ingredients into the saucepan instead of transferring the popcorn to a bowl.  The pan is so hot that the sugar begins to caramelise in the remaining coconut oil and tends to stick to the bottom of the pan!

This makes enough for about 4 people, although there are probably days when I’d like to sit and eat the whole bowl to myself!  If you do have any left, I find once cool it keeps well in airtight container for a couple of days.

2tbsp crystallised coconut nectar (see below)

1/4tsp Himalayan pink salt or good quality fine sea salt

1/4tsp vanilla powder (see below)

25g coconut oil

150g popping corn

Mix together the coconut sugar, salt and vanilla powder in a small bowl.

Heat the oil in a large heavy based saucepan over a medium/high heat and add 3 or 4 corn kernels.  When the oil is hot enough and these few pieces have popped, remove them from the pan and add the remaining corn. Cover and remove from the heat for about a minute. This will allow all the corn to heat up evenly without beginning to pop.

Return the covered pan to a high heat and the corn should start popping madly. Frequently shake the pan on the heat to prevent it from burning. If you’re feeling brave, occasionally lift the lid a very small amount to let the steam escape.

Once the rate of popping slows down to one every few IMG_4581seconds, remove from the heat. Tip the contents of the pan into a large bowl or container, add the flavouring and stir to combine. I’ve found shaking the popcorn and flavouring together in a container with a lid is the best way to get an even flavour but don’t leave the lid on if the popcorn is still hot.

Ingredients: I’ve used Ndali organic vanilla powder which is packaged in a small tin and is available in some supermarkets and health food shops and Tiana Raw Organic Crystallised Coconut Blossom Nectar (pictured below) which is available in health food shops, Holland & Barrett and Tesco.

Coconut-Nectar-Sugar-Substitute-from-TIANA

I’ve intentionally not added lots of butter and refined sugar to keep a healthier element so if anyone has any favourite ‘healthy’ popcorn flavours, please feel free to share them in the comments section below.

Quinoa

Quinoa

For my first ingredients post I’ve decided to write about Quinoa. Now the first time I tried this I really wasn’t too keen but now I’m a complete convert! Apparently quinoa is not a true grain, in fact its the seeds that we actually eat!  Over recent years its become increasingly popular because its a ‘complete’ plant based food, packed full of protein, vitamins, minerals, fibre as well as enzymes, antioxidants and phytonutrients. Which all sounds great but what does it mean?! Basically its just so good for you! Its very unusual for a plant to contain so much protein and all the essential amino acids to support a healthy body so quinoa is obviously perfect for vegetarians. But it doesn’t mean its not for non vegetarians as being nutrient dense it makes a cheap and incredibly healthy addition to the diet. Its also low in carbohydrates which means it won’t spike your blood sugar levels and releases its energy slowly into the body.

Quinoa is available three varieties, white, red and black. These are interchangeable but will obviously change the appearance of the dish you are cooking and the darker grains have a slightly nuttier flavour. It is an unrefined grain which makes it the perfect alternative to couscous, pasta and white rice.  I enjoy quinoa as its gluten free, but I’ve recently been told that some coeliacs find they can’t eat quinoa, not something I’d heard before.

I have three types of quinoa in my store cupboard, the first is an organic white quinoa (BioFair) which I use in most of my recipes. So quick and easy to prepare, its as simple as putting 1 part quinoa with 2 parts water in a pan, bringing to the boil and simmering covered for 10mins. Then remove from the heat and leave to stand for a further 10-15mins until the remaining water is absorbed. You’ll notice each seed has plumped up and popped showing a little halo! Its then ready to pack with delicious ingredients such as my Quinoa, Feta and Pomegranate Salad or season well with salt, pepper, lemon juice and olive oil and serve as an accompaniment instead of rice or couscous.

When I’m in such a hurry that there’s not even time to cook the quinoa I have emergency sachets of Merchant Gourmet Red & White Quinoa (Ready to Eat). You can literally rip open and serve as its already been seasoned! I haven’t tried this one hot as I don’t fancy cooking it in the pouch! The other product, a new one I’ve found, is a pre-cooked quinoa called NatureCrops Quinoa (Precooked). You simply pour boiling water over it and let it soak for about 3minutes before it’s ready to use.  This one is more expensive than the other options.

I’ve recently tried cooking a batch of Quinoa atIMG_4533 
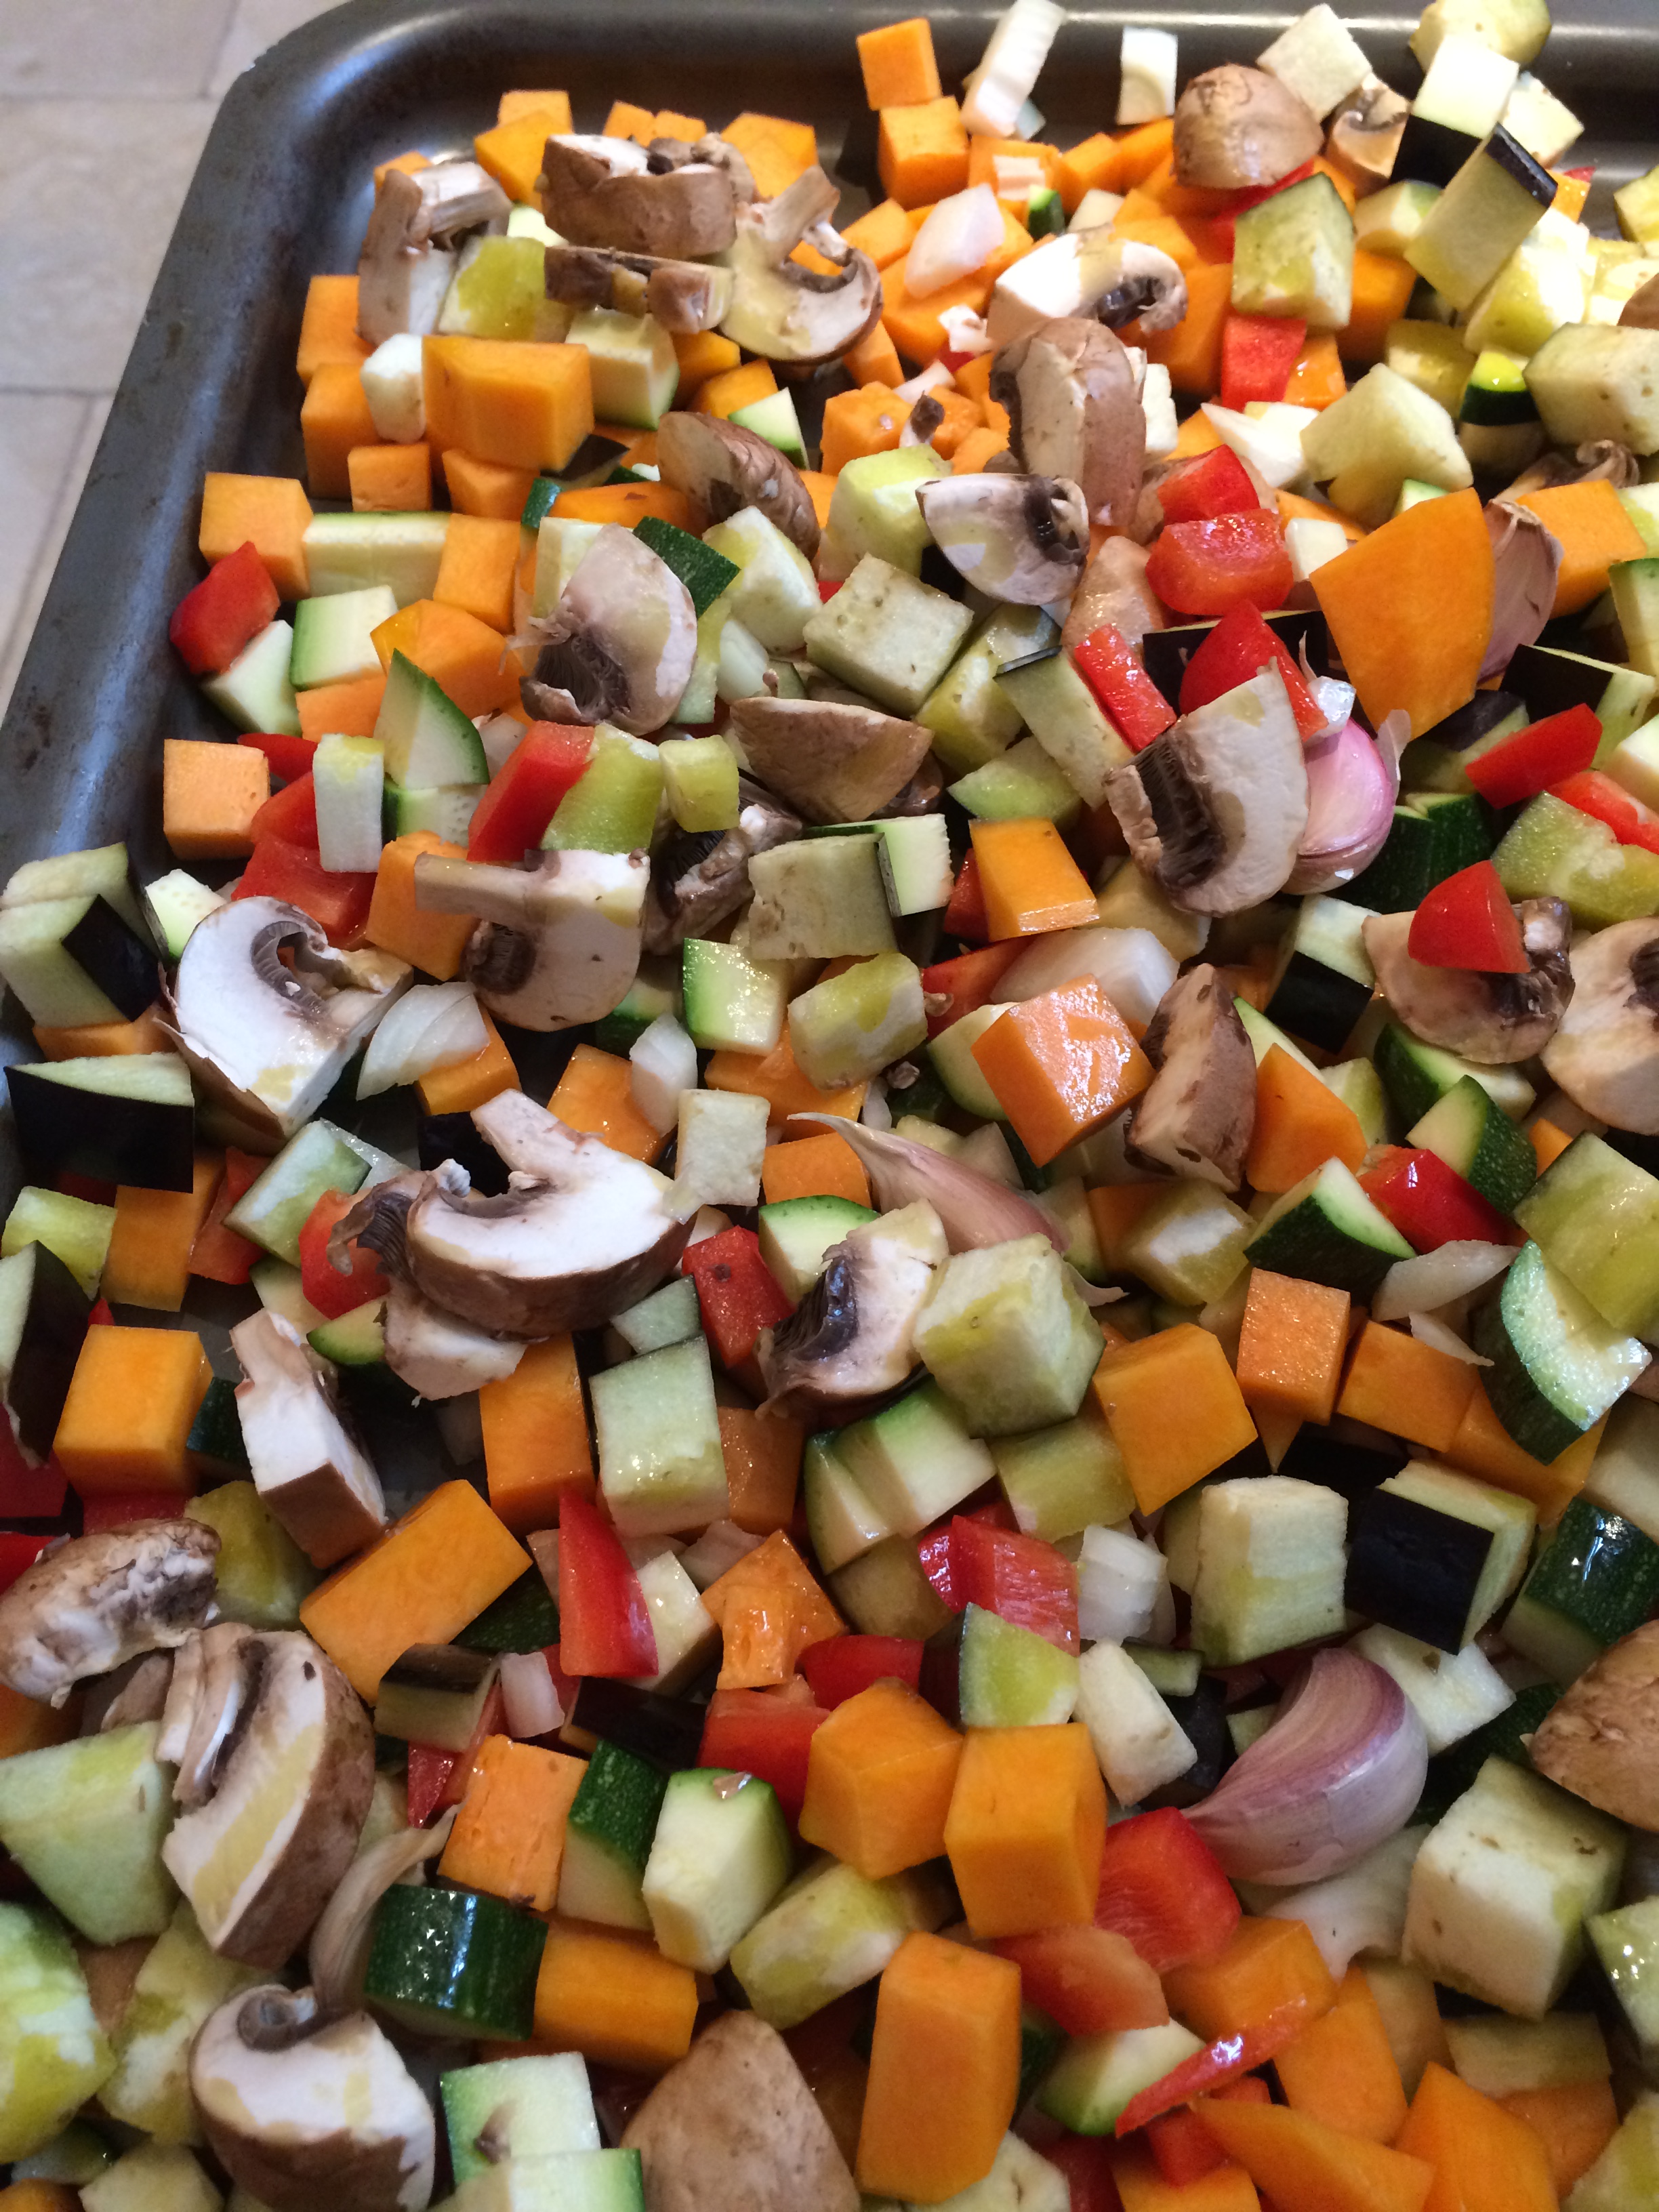
the beginning of the week and storing it in the fridge.  It’s then ready to add whatever I fancy to it!! I’m not sure how long this good intention will last but so far so good and it makes a really convenient last minute supper! This week I’ve made roasted butternut squash with a herby quinoa and tahini dressing (expect to see this recipe on the blog soon as it was so delicious!)  The other had a mad mixture of any ingredients I could find in the fridge, from onions, peppers and carrots to sun blushed tomatoes and feta with lots of lemon and fresh herbs and was also a really tasty supper dish.  If you’ve never tried it, give it a go and pack it full of all your favourite ingredients, your body will love you!

IMG_4520

Quinoa, Feta & Pomegranate Salad

IMG_4346

This has quickly become my go to salad!!  I love it.  Although I have to admit that I wasn’t too keen the first time I  cooked quinoa, but with some experimenting I discovered a great way to cook it and how to pack lots of flavour into it!  This recipe really ticks every box, it’s packed with protein, bursting with flavour and with the sparkly red pomegranate seeds, is gorgeous to look at!  A healthy substantial meal, perfect all year round.

I’ve always loved roasting vegetables, it brings out the natural sweetness and intensifies their flavour.  The ingredients list may look long but this is one of those recipes where you can play around with the flavours a little and substitute the vegetables you like, whats in season or what you have available in the fridge or garden. I really hope you enjoy it as much as I do!

If you’re in a real hurry there are some ready cooked pouches of quinoa available in the supermarkets, but check the ingredients as they can have a lot of extras added to them.  You may have noticed that I’ve given a measurement for quinoa in millilitres.  Thats because its easier to measure the ratio of 1 part quinoa to 2 parts water and so makes it easier to increase or decrease the quality you want.  I will put some extra information on my ingredients section about quinoa as soon as possible.

1 red pepper

1 medium sized onion

1/2 butternut squash, about 500g

2 courgettes

1 aubergine

150g brown cap mushrooms

10 garlic cloves

olive oil

1tsp dried chilli flakes

sea salt and black pepper

200ml quinoa (about 175g)

50g pumpkin seeds

1 pomegranate

1 lemon

about 6tbsp chopped fresh coriander

150g feta cheese

IMG_4312

Preheat the oven to 220ºC and begin by preparing the vegetables for roasting.  Deseed and chop the pepper into small dice.  Peel and chop the onion into  similar sized pieces.  Peel and remove the seeds from the butternut squash and dice.  Trim the courgettes and aubergine and cut into similar sized pieces.  Wipe the mushrooms and roughly chop.  Pile all the vegetables onto a large baking sheet with the whole unpeeled garlic cloves, drizzle over 5tbsp olive oil, the chilli flakes and season well with salt and pepper.  Turn the vegetables to coat them in the oil and seasoning.  This may look like a lot of vegetables but they reduce down in size when roasted.

IMG_4327

Roast the vegetables for about 50mins-1hr turning occasionally until they begin to turn a caramelised golden brown.

Meanwhile rinse the quinoa in a sieve and add to a saucepan with 400ml water and a little salt.  Bring to the boil and simmer covered for 10mins.  Remove the pan from the heat and leave it to stand until it has absorbed all the remaining water.  The quinoa grains should have softened but still retain a little bite.  Allow to cool slightly.

Dry fry the pumpkin seeds in a small dry frying pan until golden and beginning to pop! Carefully remove the seeds from the pomegranate, trying to avoid spraying the walls with red dots! Best to protect your clothes too!

When the vegetables are cooked, transfer to a large bowl IMG_4331
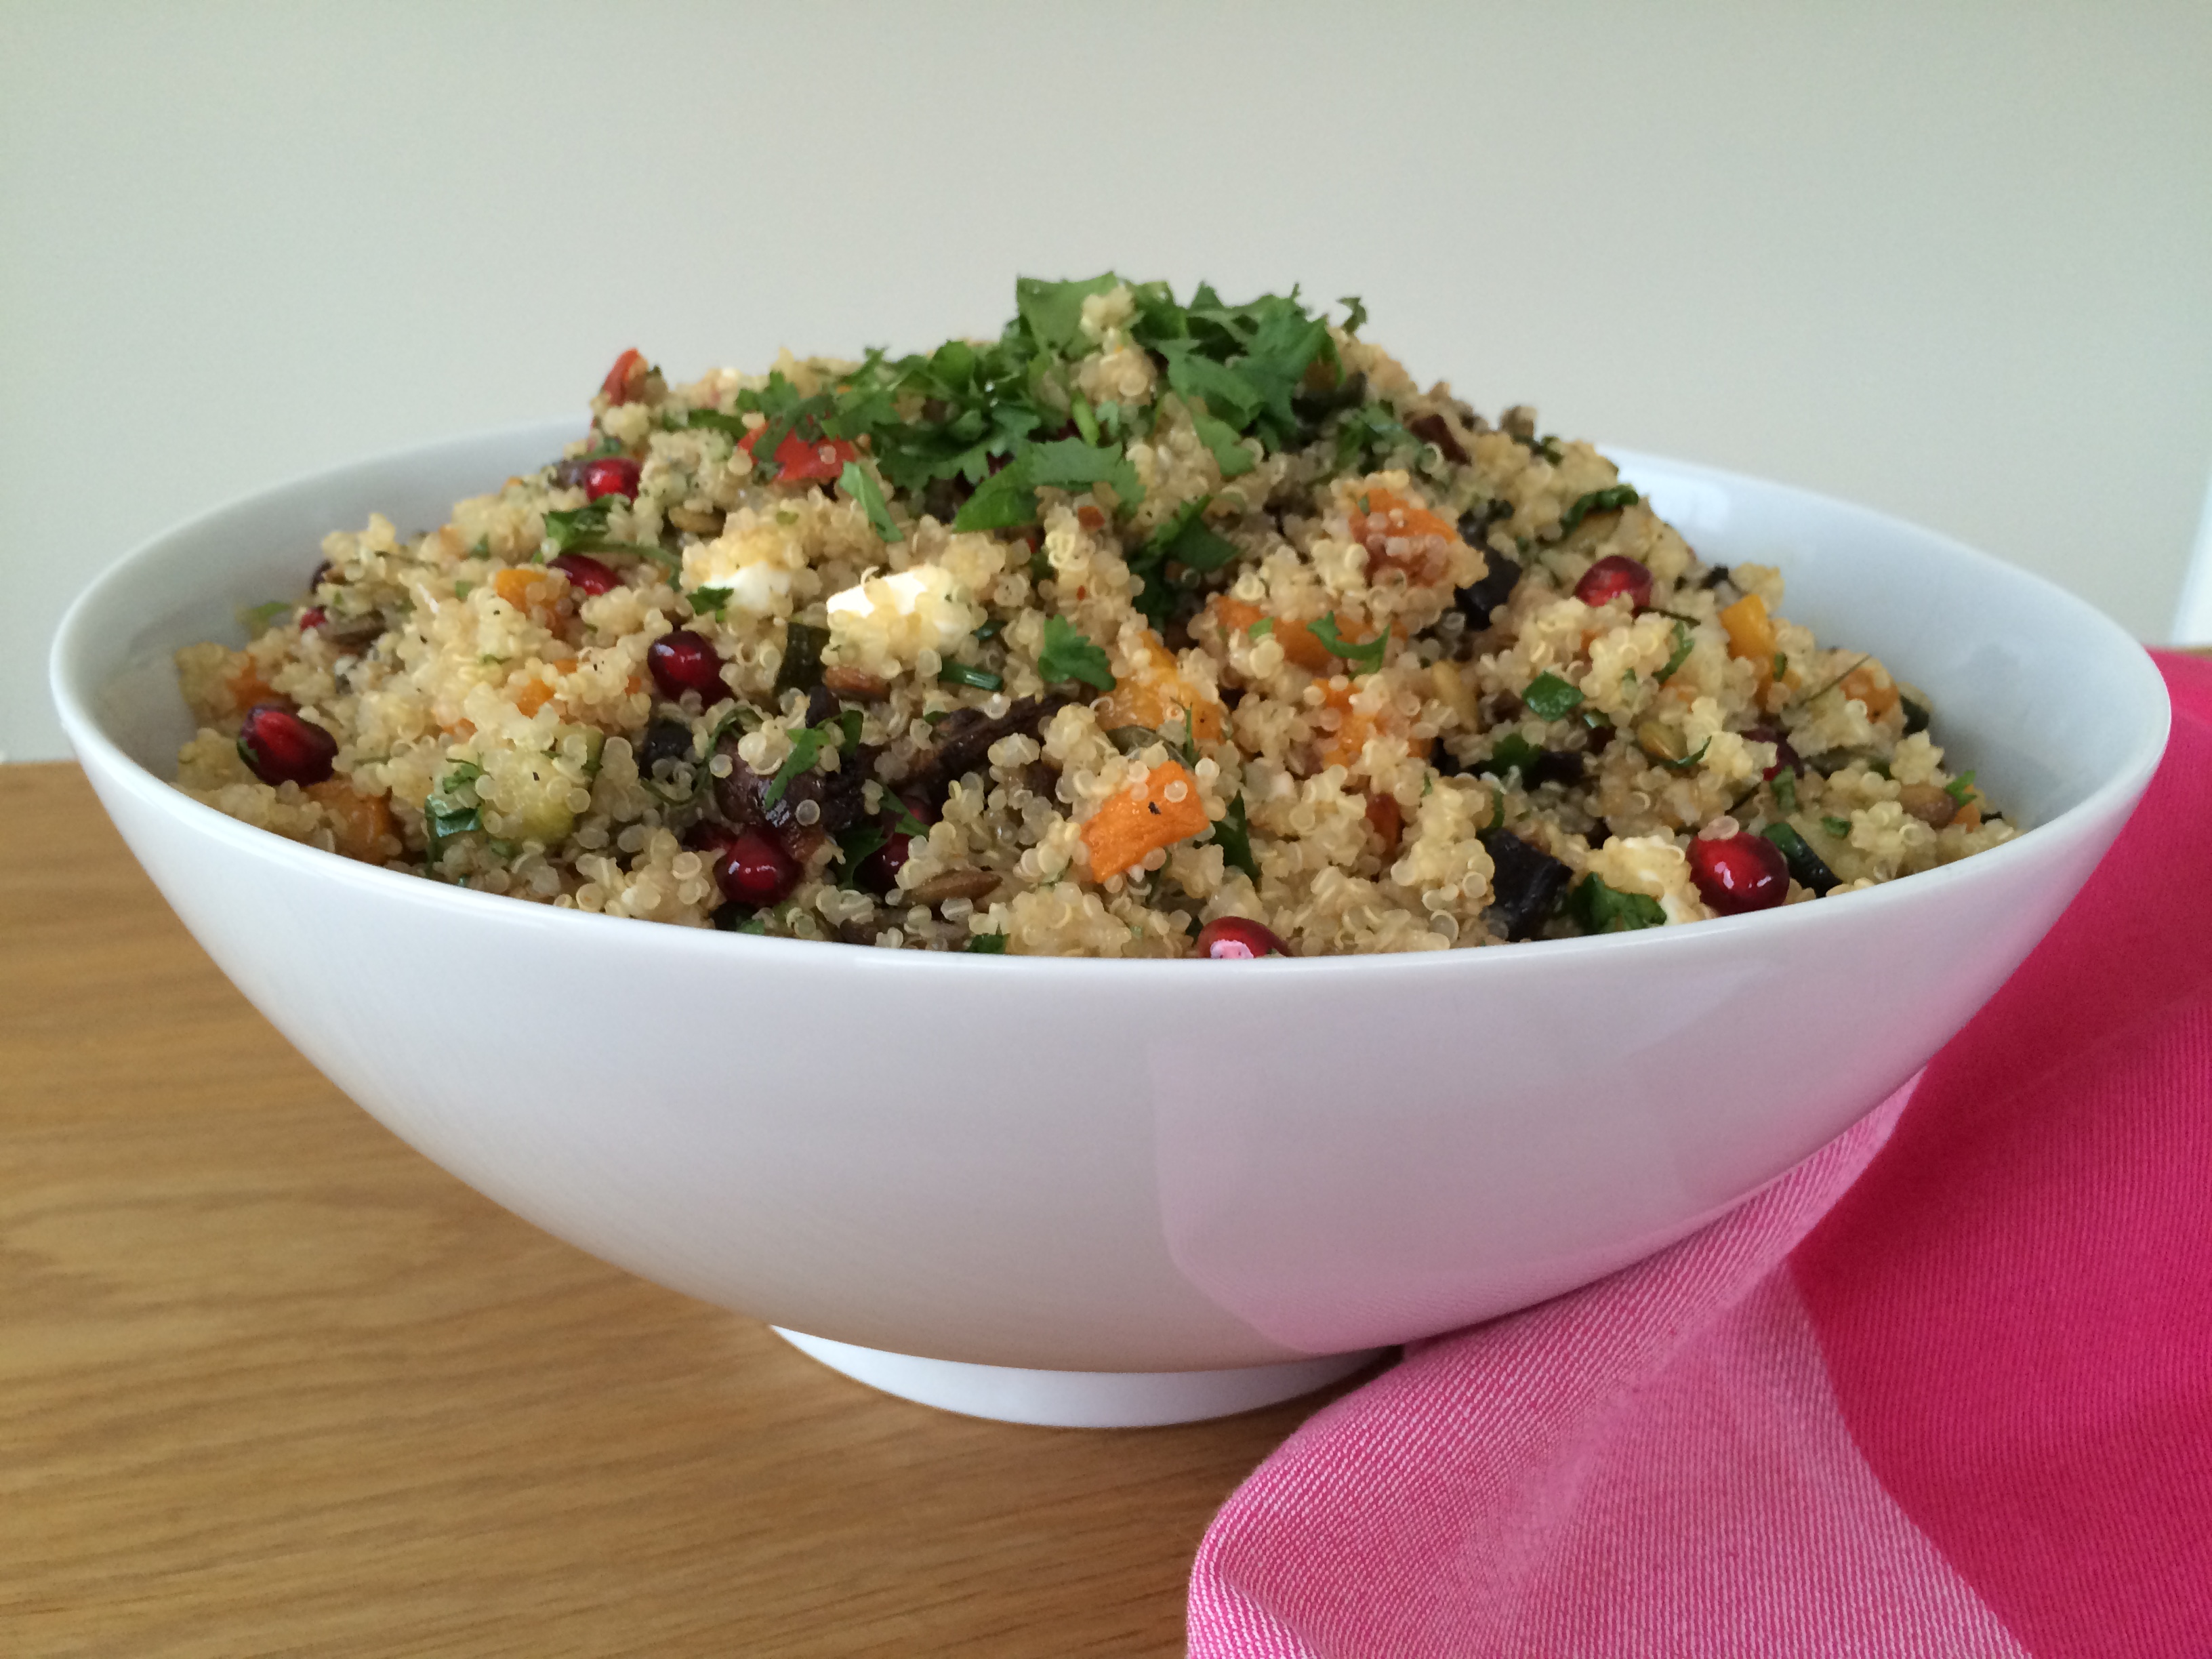
with the cooked quinoa.  Add the grated rind and juice of the lemon (about 3tbsp) with 3tbsp olive oil, plenty of seasoning and the coriander.  Cut the feta cheese into small cubes and add to the quinoa with the toasted pumpkin seeds and pomegranate.  Gently stir with a large metal spoon to combine all the ingredients together and serve.

This is delicious served freshly made when its still slightly warm but it also makes a great cold salad so can be made well in advance.  Alternatively cover and cool completely before storing in the fridge until needed.  Remove the salad from the fridge for 30mins before serving if time allows.

I often keep a sealed container of this in the fridge for when I need a quick lunch or supper.  Its great piled high with fresh salad leaves and some vine tomatoes.  It keeps in a sealed container in the fridge for 3-4 days.

IMG_4349

Minted Pineapple with ‘Bounty’ Yogurt!

IMG_4464

This recipe was a very happy discovery one evening whilst having dinner with the family and it’s so easy and so delicious I had to share it with you!

I had a lovely fresh pineapple I wanted to use, but decided I needed to make a little more effort than just slicing it up!  Mint makes a perfect partner, so the thinly sliced pineapple was jazzed up with a sprinkling of chopped fresh mint!  Delicious!  Coconut and pineapple are also great match, so with a spoonful of coconut yogurt on the side, there it was, an instant fresh and delicious dessert!  The chocolate shavings were a later addition as I recreated it for a quick dessert when family visited at the weekend.  It was perfect after a Sunday roast!

It has to be one of the quickest, freshest, most delicious desserts ever and it really is so easy to make. Perfect after a heavier meal or a summer barbecue and it would make a great mid morning snack.  If you’re trying to be good and not succumb to chocolate then it is still a deliciously sweet and tropical treat without the chocolate shavings!  By grating the chocolate, you only eat such a small amount that its the perfect way of having just a little.

I’m not going to write quantities here as you can make this to serve as many people as you like.  Simply quarter, core and peel a fresh pineapple and thinly slice as much as you’d like to serve.  Wash and finely chop some fresh garden mint and sprinkle over the pineapple.  This can be made a couple of hours in advance, covered and left until ready to serve.

Use a vegetable peeler to grate the chocolate direct from the bar.  Keep the chocolate chilled until  ready to serve.  I use a good quality 70% dark chocolate as its a great contrast to the sweet pineapple, but you could use milk chocolate if you prefer.

Serve the pineapple with the coconut yogurt spooned on the side and the grated chocolate sprinkled on top.

I like serving a large plate of minted pineapple and bowls of coconut yogurt and chocolate on the side, everyone can then help themselves and build their own dessert!

IMG_4514
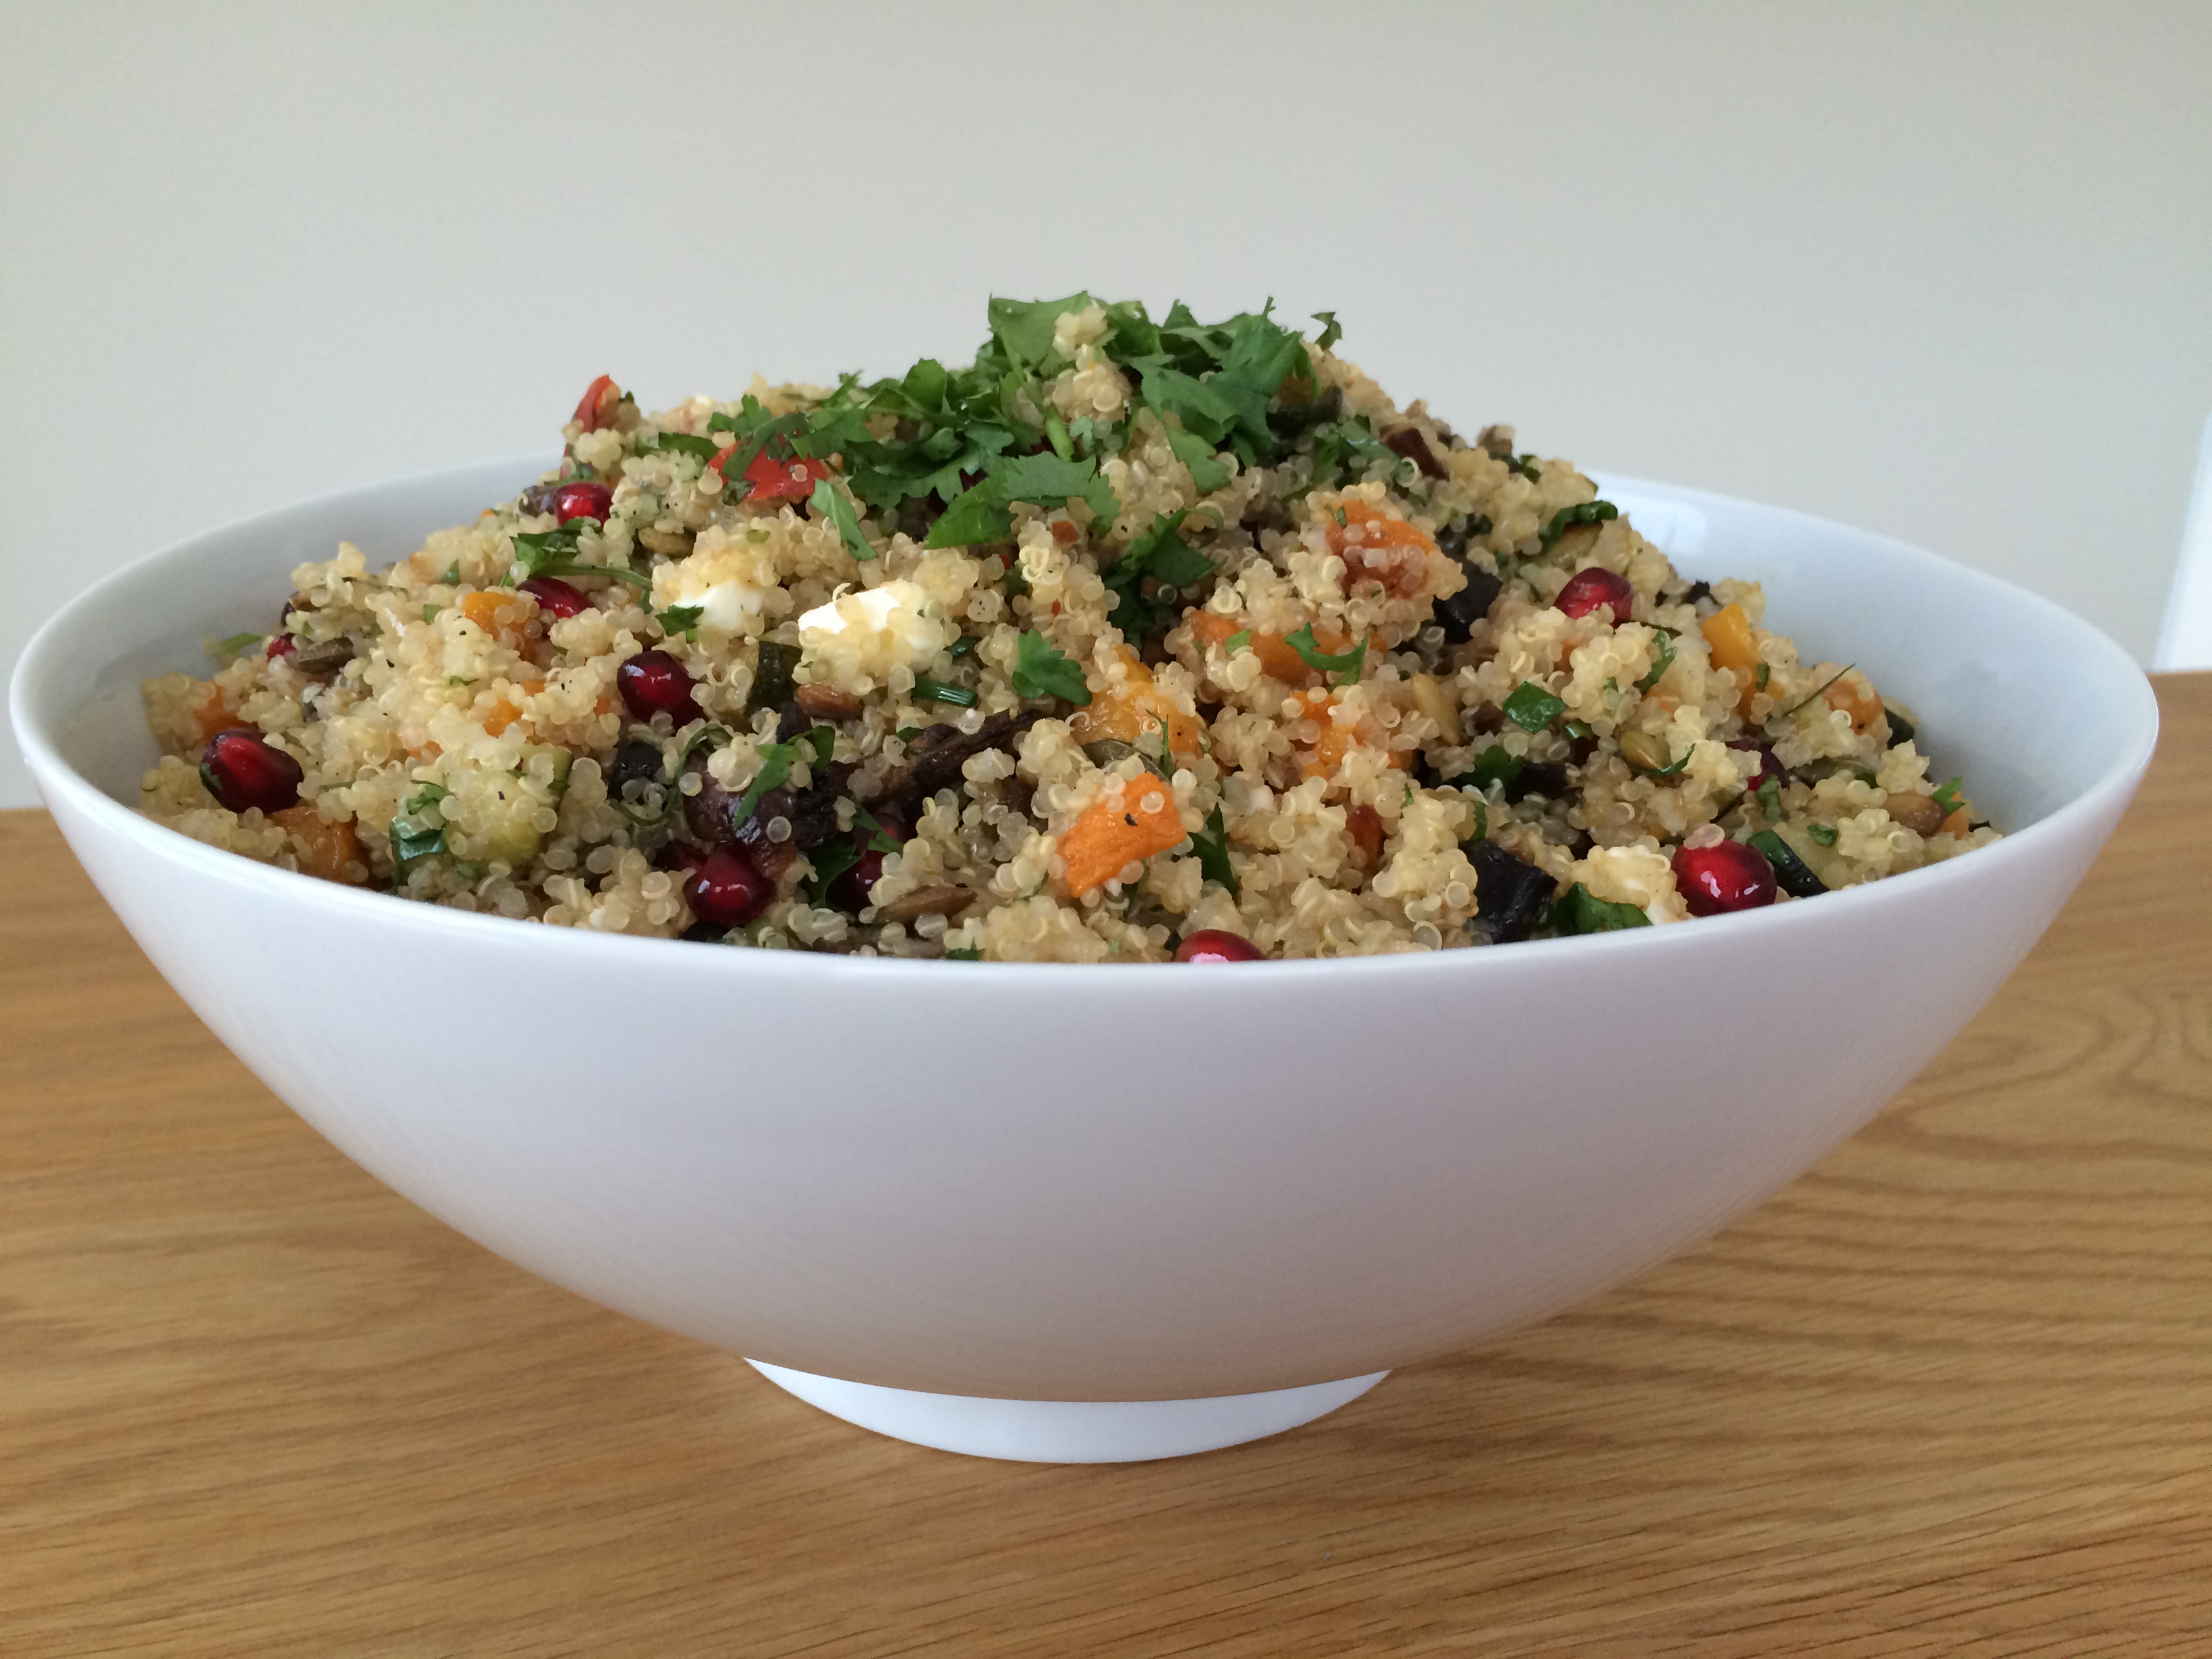
Coconut yogurt is 100% natural and made from coconut milk, rather than being a flavoured yogurt.  I’ve tried two brands.  Coyo which is a deliciously rich, thick and creamy coconut yogurt and The Coconut Collaborative, which is slightly lighter but also deliciously creamy, probably my favourite as its not so rich.  Most supermarkets are stocking coconut yogurt or you can find it in most health food shops as its a great non dairy alternative.

Pea and Watercress Soup

P&Wsoup As the Spring temperature took a sudden dip I found myself wanting a warming bowl of soup. Not a thick, stand your spoon up in it, winter vegetable soup but a lighter, fresher one.  This Pea & Watercress soup is like Spring in a bowl! Not only is the colour amazing but the flavours are intense too.  It may seem like an awful lot of peas, but as well as giving the soup a great flavour they also act as a thickener.  The watercress then adds a lovely light peppery flavour on top.

This really is so quick and easy to make and the soup only contains three ingredients! A bowl of this will make a huge boost to your daily vegetable intake, the peas adding a great source of protein and the watercress is packed full of amazing vitamins and minerals.  A perfect lunch, starter or pour into a flask for a healthy packed lunch.  If you have time then do make the seed topping as it gives a great crunchy contrast.  Sprinkle them on top just before serving and if you’ve got any left then store them in an airtight container as they’re great sprinkled over salads. They also add a little protein and are an excellent source of essential minerals and good fats.

4tsp marigold Swiss vegetable bouillon powder (vegan)

680g (1 1/2 lb) frozen peas

100g watercress

salt and pepper

for the topping;

25g pumpkin seeds

25g sunflowers seeds

1tbsp sesame seeds

1tsp sumac

a little olive oil or lemon infused olive oil

Put the stock in a large saucepan with 1 litre of water and bring to the boil.  Add the peas and simmer, covered for 5 mins.

Add the watercress, bring back to the boil and simmer for a further 2 mins.

Remove from the heat and blend in batches until smooth.  Return to the pan to warm through.  Check the seasoning and add a little salt and pepper if necessary. I found the stock and peppery watercress had seasoned the soup sufficiently.

Meanwhile put the pumpkin seeds and sunflower seeds in a small dry frying pan and toast on a medium heat until beginning to brown and pop!  Add the sesame seeds and sumac and cook for a further minute, shaking the pan so they don’t burn.  Its best not to take your eyes off them at this point!

Serve the soup with the seeds sprinkled over and a few drops of olive oil drizzled on top.  If you have lemon infused olive oil, thats even better!

Serves 4-6

IMG_4607

Ingredient Hint

Sumac is a berry thats ground down to give a tangy lemony flavour to dishes and is often used in Mediterranean and Middle Eastern cookery.  Most supermarkets are now stocking it with the dried herbs and spices.

Thai Pesto

Version 4

I fell in love with this the first time I made it and I’ve been experimenting with the flavours ever since!  I wanted to create something to pep up a piece of roasted salmon and vegetables and this does it perfectly.  It has a subtle warmth from the chilli balanced with the fragrance of the herbs, it not only tastes good but smells amazing too!  I’ve tried the Thai Pesto with steamed courgette noodles and sautéed prawns, stir fried courgette and carrot noodles with mushrooms and its also perfect with a piece of grilled chicken, simply stirred into some pasta or spooned on top of some rustic tomato soup.  The uses really are endless.  Adding spinach to the pesto also helps increase your vegetable intake and as its raw you really get all the goodness from it!  So simple I promise it only takes about 10mins to make!  This works really well in a food processor but if you’ve got a nutri bullet or similar you’ll have it whizzed together in a flash, just add the oil and lime juice with the herbs and seeds.  Unlike regular basil pesto it doesn’t contain Parmesan cheese so is dairy free too.

2 garlic cloves, peeled and roughly chopped

4cm piece fresh ginger, peeled and roughly chopped

1 mild green chilli, deseeded and roughly chopped

25g bunch fresh basil

25g bunch fresh coriander

50g baby spinach leaves

50g pumpkin seeds

salt and pepper

juice of 2 limes,

about 4tbsp olive oil

Place the garlic, ginger and chilli in a food processor and blend until finely chopped.

Add the pumpkin seeds, herbs and spinach with salt and pepper and process until all the ingredients are finely chopped.

With the motor running add the lime juice and olive oil and blend all the ingredients together to form a loose paste scraping down the sides occasionally.  If the pesto is too thick add an extra splash of lime juice or ice cold water until you get the right consistency.

Store the pesto in an airtight container in the fridge for up to 5 days.IMG_3984

Thai Pesto with courgette noodles and prawns.  This is so delicious and so healthy it feels like a real treat, its become one of my favourite speedy midweek suppers!  See my post on Spiralized Vegetable Noodles.

Ottolenghi

293.Blog_London-Hotspot-Find-Ottolenghi-Islington-1024x682

I’ve been a fan of Ottolenghi for a while now, especially since Yotam Ottolenghi and Sami Tamimi came to Bath to promote their book Jerusalem by displaying their skill at marrying ingredients in a fantastic talk, demonstration and sampling.  I’ll often cook Ottolenghi recipes when friends come to stay and the family have some firm favourites which we often have for supper. Their recipes are packed full of delicious fresh ingredients and wonderful blends of herbs and spices.  It’s so easy to eat exciting, tasty, nutritious meals.

So you could say I was a little bit excited when we managed to book a table at the new Ottolenghi Spitalifelds which recently opened.  As soon as you walk through the door you’re met with an amazing array of counter dishes, gorgeous coloured salads piled high on big white platters alongside the most delicious looking rare beef or tuna!  I knew it was going to be difficult to chose, it all looked so good!   However this choice is made easier as you order dishes for the table to share, so the only problem is all agreeing what to order!  There were plenty of gluten free options, I was so pleased to discover I could have over two thirds of the dishes from the counter and kitchen menu, which is rarely the case eating out.  In fact I was given a personally marked up menu ticked with the dishes I could chose from.  The menu changes daily depending on what’s seasonal and available, so you know your food has only the freshest most flavoursome ingredients.

IMG_4217
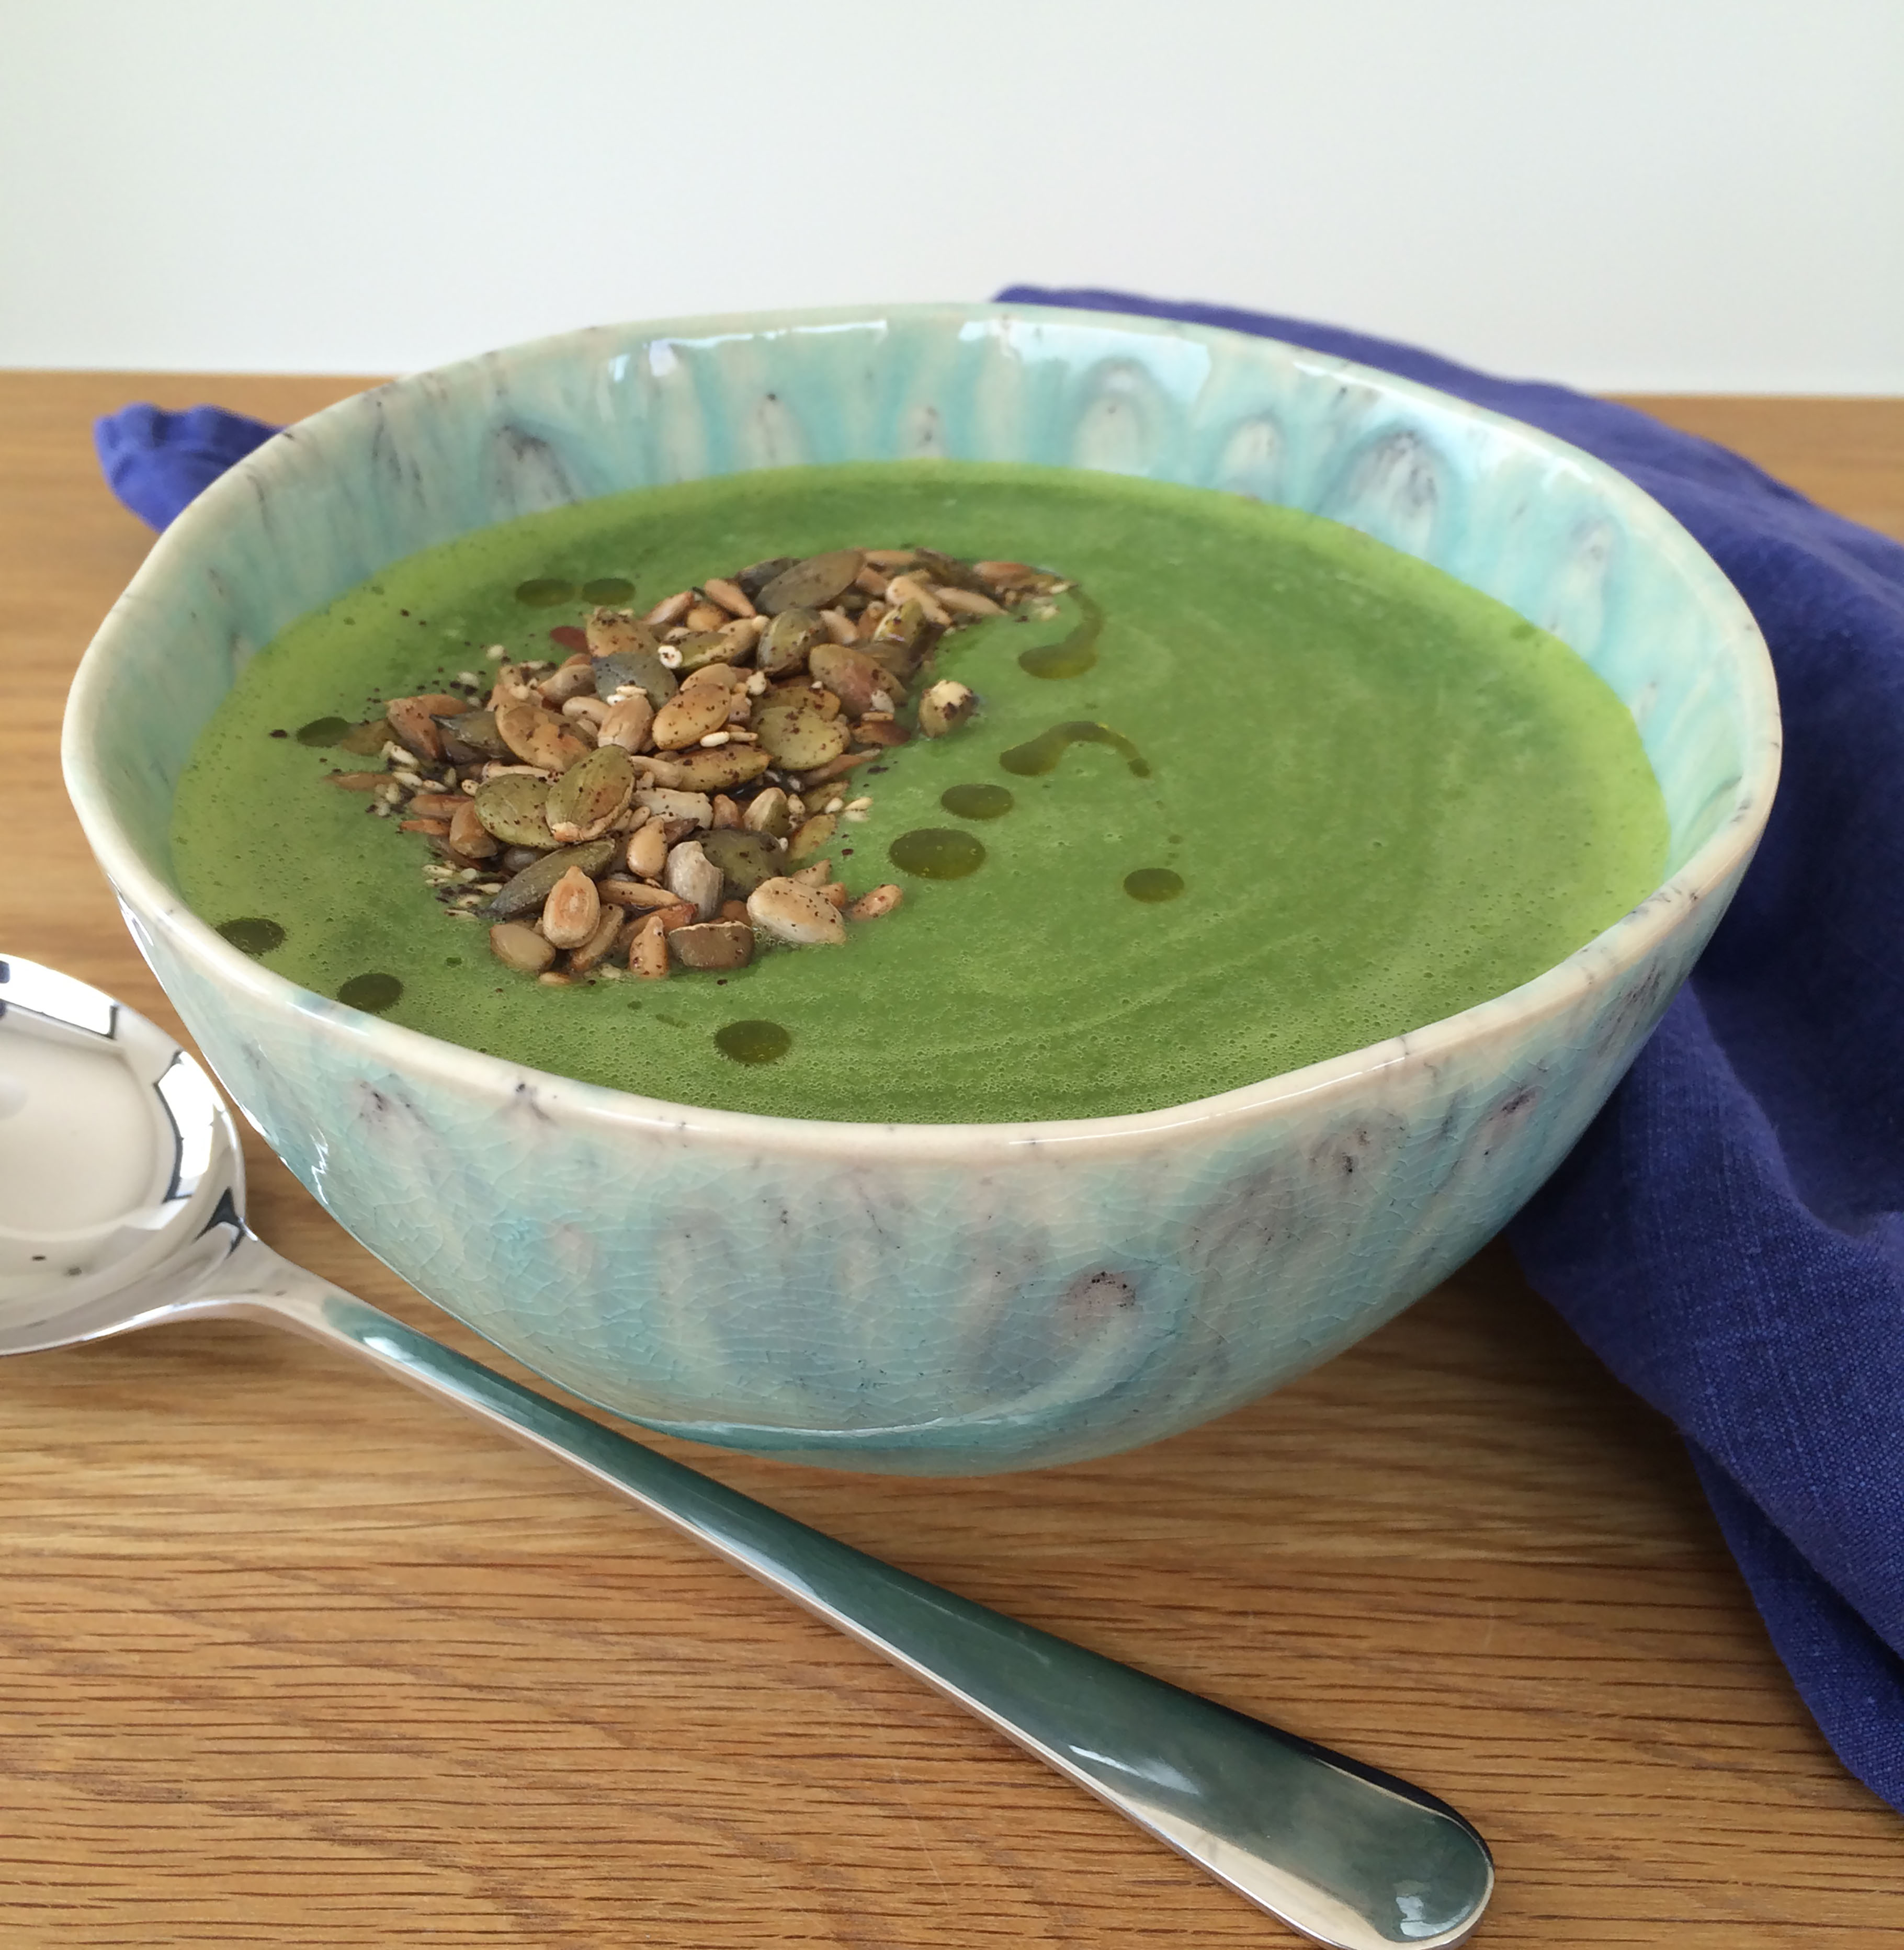
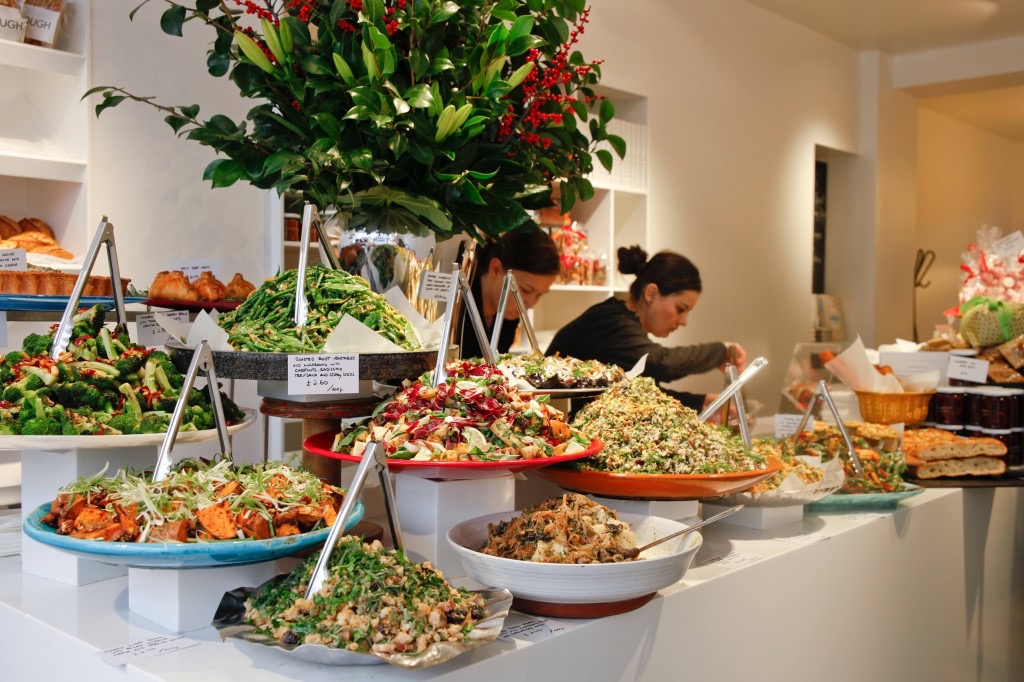
If I had to pick out my favourites it would without doubt be 3 of the salads.

Roasted aubergine with sorrel yogurt, turmeric picked radish, spring onions and almonds. (pictured right)

Mixed green beans, broad beans and peas with toasted coconut, mint and lemon.

Broccolini , green courgettes, Parmesan, pistachio and truffle oil. (pictured below)

The Seared tuna with mixed sesame seeds and soy, honey, spring onion and ginger sauce also looked amazing but unfortunately was off the menu for me!

IMG_4216The flavour combinations were so delicious and the food felt good and healthy.  We sat on part of a larger table and the other diners were keen to share their thoughts on the best dishes and didn’t mind us ogling at their food as it arrived!  The friendly staff also recommended some excellent wines from their list and brought out little samples of the more obscure ones.  If you get a chance to go I would highly recommend it.  I’m sure you’d get the same experience at any of the other Ottolenghi restaurants or delis though sadly they are only in London, but you could take a look at one of their books and try some recipes for yourself!  (see listings in My Favourite Books)

Spiralized Vegetable Noodles

IMG_3980

This seems to be one of the latest buzz foods so I had to have a go to see what all the fuss was about!  Not being able to eat regular pasta and not a big fan of the high sugar gluten free alternatives I’m often slightly stumped over what to have for that quick midweek supper so I wanted to see if spiralized vegetable noodles would be a suitable option. Well I’m now converted!  I was given a handheld spiralizer, a bit like an oversized pencil sharpener and set about making some courgette noodles.  Its amazing how long a length of noodle you can make!  I stir fried my first batch in a little coconut oil and had them with a homemade pesto.  Not the most photogenic result but it tasted good.  The second batch I steamed for about 3-5 minutes, turning occasionally with a spaghetti spoon.  These noodles kept their gorgeous green colour and still retained a little bit of crunch.  I served them with sautéed prawns and my Thai Pesto, well suddenly my super quick mid week supper tasted like a real treat.  Full of fresh flavours and full goodness at the same time.  I’ve since tried carrot noodles which are great on their own or mixed with the courgette as you can steam them together.  I’ll definitely be adding more recipes using vegetable noodles so I hope you enjoy them as much as I do!

IMG_4082

For a vegetarian supper, drizzle the cooked noodles with olive oil and fresh lemon juice and serve with sautéed mushrooms, crumbed feta, toasted pumpkin and sunflower seeds and sprinkle over some chopped fresh chives and chilli flakes. Delicious!

Cucumber is also great spiralized if you don’t mind your children trying to suck it up like spaghetti!!

Take a look on My Favourite Equipment page where you’ll find details of the spiralizer I use.